
Last Updated on 10 months ago by Sachin G
When I first started exploring Ansible automation, the very first question I stumbled upon was: How does Ansible know which servers to manage? That’s where the concept of an Ansible inventory comes in. If you’ve ever wondered what the “inventory file” in Ansible is and why it’s so important, you’re not alone. Almost every beginner has this moment of confusion.
I still remember when I was setting up my very first Ansible playbook. Everything seemed clear until I had to tell Ansible which servers I wanted it to control. That’s when I realized that the inventory file is not just a “list of servers” — it’s the foundation of Ansible’s entire configuration management system.
In this tutorial, we’ll break down the Ansible basics by focusing on the inventory file. We’ll explore what it is, how it works, how to configure it step by step, and even look at examples of static and dynamic inventories. By the end of this article, you’ll not only understand the structure but also gain confidence to manage your own servers with Ansible.
What is Ansible Inventory?
At its core, the Ansible inventory is simply a file (or a script) that tells Ansible which hosts (servers, devices, or nodes) it should connect to. Think of it as your master contact list for automation.
For example, let’s say you have:
- Two web servers running Nginx
- One database server running MySQL
- One load balancer
Instead of manually SSHing into each machine, you can define them all inside the inventory file. From there, Ansible will know exactly where to run tasks and playbooks.
In short: The inventory file is the backbone of Ansible configuration management, grouping hosts into categories for easy automation.
Types of Ansible Inventory
There are two main types of inventories in Ansible:
1. Static Inventory
This is the most common and beginner-friendly type. It’s usually a simple text file (INI or YAML format) where you manually list servers and groups.
Example (INI format):
[web]
192.168.1.10
192.168.1.11

[db]
192.168.1.20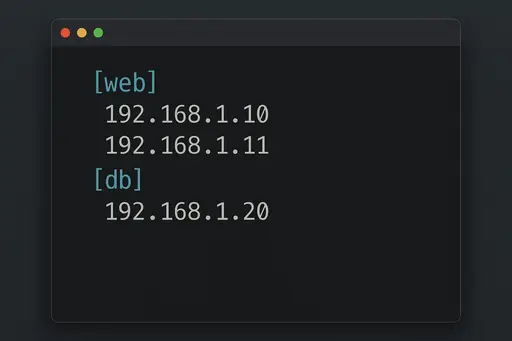
2. Dynamic Inventory
As infrastructure grows (think AWS, Azure, or Kubernetes), maintaining static files becomes painful. That’s where dynamic inventories shine. They use scripts or plugins to automatically fetch host information from cloud providers or APIs.
Example (Dynamic AWS plugin in YAML):
plugin: aws_ec2
regions:
  - us-east-1
filters:
  tag:Environment: dev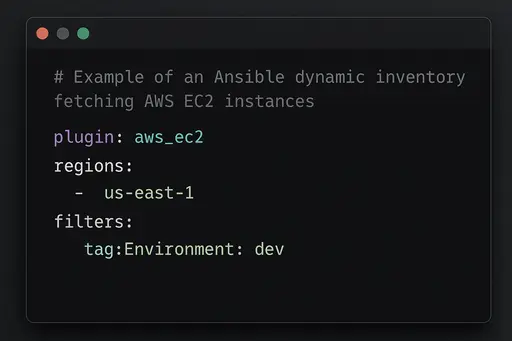
When to use what?
- Static: Great for small labs, testing, or environments with a fixed number of servers.
- Dynamic: Essential for production-scale environments where servers are created/destroyed frequently.
Step-by-Step: How to Configure an Ansible Inventory File
Here’s a simple guide to configuring your first inventory file.
Step 1: Create the Inventory File
By default, Ansible looks for an inventory file at:
/etc/ansible/hostsBut you can also define a custom inventory file (recommended). For example:
nano ~/my_inventory.iniStep 2: Add Hosts
Let’s add a few servers:
[web]
192.168.1.10 ansible_user=root
192.168.1.11 ansible_user=ubuntu

[db]
192.168.1.20 ansible_user=admin
Step 3: Test Connection
Run a simple Ansible ping test:
ansible -i my_inventory.ini all -m pingExpected output:
192.168.1.10 | SUCCESS => { "ping": "pong" }
192.168.1.11 | SUCCESS => { "ping": "pong" }
192.168.1.20 | SUCCESS => { "ping": "pong" }
Pro Tip: If you face SSH issues, ensure your keys are properly copied using
ssh-copy-id.
Ansible Groups and Hosts Explained
One of the best features of the inventory hosts file in Ansible is the ability to create groups. Groups allow you to target sets of servers at once.
Group Example:
[frontend]
192.168.1.10
192.168.1.11

[backend]
192.168.1.20

[all_servers:children]
frontend
backend
Here, frontend and backend are groups, and all_servers combines both into a parent group.
Why this matters:
- Easier to manage 50 servers at once.
- Cleaner playbooks (just target groups instead of individual IPs).
- Great for separating environments (e.g., dev, staging, prod).
Pro Tip: If you want to go deeper into Linux/DevOps/automation, I’ve curated a list of Recommended Courses here. They’re structured step-by-step and perfect for learners who want to build real-world skills.
Ansible Inventory in YAML Format
While INI is common, YAML is cleaner and easier for complex setups.
Example YAML inventory:
all:
  hosts:
    web1:
      ansible_host: 192.168.1.10
      ansible_user: ubuntu
    web2:
      ansible_host: 192.168.1.11
      ansible_user: ubuntu
  children:
    db:
      hosts:
        db1:
          ansible_host: 192.168.1.20
          ansible_user: admin
YAML is especially useful when working with Ansible best practices, as it integrates better with playbooks.
Static vs Dynamic Inventory: Which One Should You Use?
Here’s a quick comparison i created :
| Feature | Static Inventory | Dynamic Inventory |
|---|---|---|
| Setup effort | Low | Medium/High (requires plugin or script) |
| Scalability | Limited | Excellent |
| Best for | Small setups, labs, local testing | Cloud environments, production clusters |
| Example | Manual IP list | AWS EC2, GCP, Azure, Kubernetes |
Best Practice: Start with static inventory for learning. Move to dynamic once you’re managing 10+ servers in the cloud.
Real-World Use Cases of Ansible Inventory
- Web Hosting Panels: Group servers as
web,db, andcachefor seamless deployment.
- DevOps Teams: Separate staging vs production environments in the same inventory file.
- Cloud Scaling: Use dynamic inventory to automatically track new instances in AWS.
- CI/CD Pipelines: Trigger Ansible playbooks against specific groups for deployments.
From personal experience, I found grouping hosts into dev, staging, and prod a lifesaver when managing client projects. It eliminated human error and gave me confidence that the right servers were being targeted.
Best Practices for Ansible Inventory
- Use groups wisely: Avoid cluttering with single hosts; group them logically.
- Prefer YAML over INI: Especially for larger environments.
- Keep sensitive data separate: Use
ansible-vaultfor passwords and keys.
- Use dynamic inventory in cloud: Don’t manually update IPs for ephemeral servers.
- Document everything: Add comments in your inventory file for clarity.
FAQs about Ansible Inventory
It’s a configuration file where you define servers (hosts) that Ansible manages.
Yes! You can pass a custom inventory file using -i a flag. Example:
ansible -i my_custom_inventory.ini all -m ping
Static: Manually listed servers.
Dynamic: Automatically discovered servers via plugins/scripts.
Both work, but YAML is more structured and integrates better with Ansible best practices.
Don’t store passwords in plain text. Use ansible-vault to encrypt sensitive values.
Understanding the Ansible inventory is like learning the alphabet before writing sentences. Without it, playbooks have no direction. With it, you can scale from managing a couple of test servers to orchestrating entire production clusters.
When I first wrapped my head around the inventory concept, my Ansible journey became much smoother. Suddenly, tasks that seemed complicated — like updating all web servers at once — felt effortless.
So here’s your action plan:
- Create your first static inventory file.
- Run a simple
pingtest.
- Experiment with groups and YAML format.
- Once comfortable, explore dynamic inventory for cloud setups.
Happy automating with Ansible!

I’m Sachin Gupta — a freelance IT support specialist and founder of techtransit.org. I’m certified in Linux, Ansible, OpenShift (Red Hat), cPanel, and ITIL, with over 15 years of hands-on experience. I create beginner-friendly Linux tutorials, help with Ansible automation, and offer IT support on platforms like Upwork, Freelancer, and PeoplePerHour. Follow Tech Transit for practical tips, hosting guides, and real-world Linux expertise!