

Last Updated on 3 months by Sachin G
When working with high-availability infrastructure, Network Teaming on CentOS/RHEL becomes an essential tool in any Linux admin’s arsenal. Based on personal deployment experiences in both test environments and production-grade setups, network teaming offers a modern and flexible way to ensure network reliability, redundancy, and even load balancing—all critical for uptime-sensitive services.
In this post, we’ll explore how to configure network teaming using nmcli, dive into team configuration files, and discuss team modes including active-backup and 802.3ad link aggregation, based on real-world usage. These steps outline the process of configuring and managing Network Teaming and Link Aggregation on RHEL/CentOS Stream operating systems. It details the logical linking of multiple network interfaces to improve redundancy and throughput using the teamd service and the nmcli tool. The guide walks through creating team interfaces, assigning ports, setting IPv4 configurations, and managing connections effectively.
Understanding Network Teaming and Link Aggregation
Teamd is the service and Linux kernel driver that works in teaming. In teaming, a runner manages load balancing and active backup. Teamd support runner, which consists of these methods: roundrobin, broadcast, activebackup, loadbalancer, lacp.
Network Teaming is a feature introduced in Red Hat Enterprise Linux that combines multiple NICs (Network Interface Cards) into a single logical interface. This technique increases network availability and, in some cases, improves throughput.
Unlike older bonding drivers, teaming uses a lightweight kernel driver with a user-space daemon (teamd) to manage interfaces more flexibly.
Using teaming helped us maintain uptime during NIC failure simulations—zero packet loss and automatic failover proved the setup was worth every minute.
How Is Network Teaming Different from Bonding in Linux?
In summary:
Bonding: Older, uses kernel-only configuration, less flexible.
Teaming: Newer, modular, uses user-space daemon (teamd), better diagnostics and performance tuning.
In my experience, teaming also integrates better with nmcli, which is now the standard in RHEL 8 and RHEL 9.
How to Configure Round-Robin Teaming on RHEL/CentOS
Let’s walk through a configuration of round-robin, you can use instead of round-robin active-backup mode teaming on RHEL 9. Active-backup is for to achieve failover and redundancy for an internal DNS and mail relay server.
Prerequisites:
- At least two NICs (e.g.,
ens33,ens34)
- Installed
NetworkManagerandnmclicommand-line tool
- Root privileges
Display the existing available network interfaces. The ‘ip link’ command will display the existing interfaces.
# ip link

Add the team interface and configure Network teaming :
In the teaming, all the network interaction will be go through the team interface. Which will create by multiple network port interfaces. Here we will create a team interface and apply the IPV4 parameters through nmcli tool utility.
Run the below command will create a team interface connection.
# nmcli con add type team con-name “connection–name” ifname “Interface Name”
In the above command we can also add runner configuration, which is based on JSON format , runner and json can be specifies like below command.
# nmcli con add type team con-name “CONNECTION NAME” ifname “INTERFACE NAME” team.config ‘{runner”:{name”: “OPTION”}}’
Runner having one different option method like broadcast, roundrobin, activebackup, loadbalance, lacp.
Below I have create my team interface with connection name team1 and interface name team1.
# nmcli con add type team con-name team1 ifname team1
If you want to add a runner in config, you can pass in the option section
# nmcli con add type team con-name team1 ifname team1 config ‘{“runner”:{name”: “ roundrobin”}}’
Assign static IPv4 attributes on the team interface.
The below command will assign a static IPv4 address to the team0 interface.
#nmcli con mod team1 ipv4.address 192.168.0.11/24
#nmcli con mod team1 ipv4.method manual
Here in the team IPv4 assignment, the IPv4 address should be assigned before to declaration of manual.

Create and assign the port interfaces:
Here we are creating each of the port interfaces with below syntax.
# nmcli con add type team-slave con-name CONNECTTION NAME ifname INTERFACE_NAME master TEAM NAME
Where CONNECTION NAME will be the name to the port, INTERFACE NAME is the name of an existing interface and TEAM NAME will be the connection name of the network team interface.
#nmcli con add type team-slave ifname enp0s8 con-name team1-port master team1
#nmcli con add type team-slave ifname enp0s3 con-name team1-port2 master team1
Down and UP the team and port interfaces.
Here, nmcli will also be used to manage team and port interface connections with the below command.
# nmcli dev dis INTERFACE NAME
# nmcli con up CONNECTION NAME
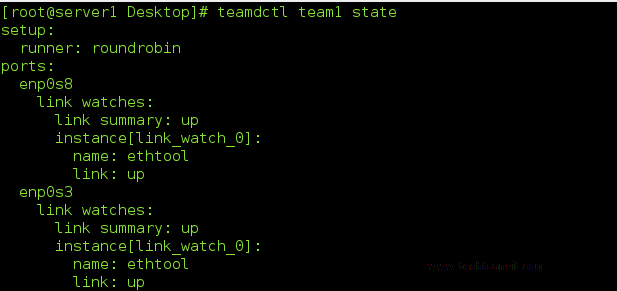
Display the team interface status.
When the team interface will be up and we can check through below command status of team interfaces.
# teamdctl team1 state
#nmcli con show
#nmcli con show --active
Check the local network gateway through network team interface. Use another terminal and ping the local gateway thorugh ping command thorugh the team1 interface.
# ping –I team1 192.168.0.254
Uses of teamnl and teamdctl commands:
Teamnl and teamdctl command is very useful to check network teams, this command will only work on active team interfaces.
- To Show team ports of the team1 interfaces :
# teamnl team1 ports
- To check the active port of team1 :
# teamnl team0 getoption activeport
- To check the status of the team1 interface :
# teamdctl team1 state
Exploring Other Teaming Modes in RHEL 8/9
The most common ones I’ve tested include:
activebackup: One interface active, rest on standbyroundrobin: Transmits packets in rotationbroadcast: Sends every packet on all portsloadbalanceDynamically balances traffic802.3ad: Uses LACP (Link Aggregation Control Protocol) for managed switches
In a load test with 802.3ad link aggregation on Intel NIC Teaming, we saw 1.8x bandwidth gain when connected to a managed switch with LACP
The Benefits of Link Aggregation
Redundancy: If one NIC fails, traffic continues
Performance: Combine the throughput of multiple NICs
Scalability: Ideal for virtual hosts or clustered environments
Network reliability: Great for mission-critical systems
In one instance, we used centos link aggregation setup for high availability for a web cluster behind HAProxy—ensuring backend connectivity stayed consistent even during NIC failure.
FAQ’s
Generally yes—many use the terms interchangeably. Technically:
NIC teaming refers to combining multiple NICs
Link aggregation includes LACP and similar standards
In Linux, they achieve similar results.
From experience, here’s what usually helps:
Check teamd logs: journalctl -u NetworkManager
Use teamdctl team0 state for live status
Verify configs: nmcli con show
Test redundancy: Unplug one NIC and ping
Yes, but with caution.
I once tested multi-NIC configuration using Intel and Realtek cards—basic active-backup mode worked fine. But advanced modes like 802.3ad may fail unless both NICs support the same capabilities.

I’m Sachin Gupta — a freelance IT support specialist and founder of techtransit.org. I’m certified in Linux, Ansible, OpenShift (Red Hat), cPanel, and ITIL, with over 15 years of hands-on experience. I create beginner-friendly Linux tutorials, help with Ansible automation, and offer IT support on platforms like Upwork, Freelancer, and PeoplePerHour. Follow Tech Transit for practical tips, hosting guides, and real-world Linux expertise!