When managing servers with a command line interface, nothing is more empowering than mastering nmcli network configuration. Over the years, I’ve used nmcli (Red Hat Network Manager CLI) in various scenarios, ranging from quick static IP assignments on test environments to full network setups without a GUI in RHEL production systems. What makes nmcli so powerful is not just its scriptability but the consistency it offers across both RHEL 8, RHEL 9, and CentOS Stream.
When I first time used nmcli, it was out of necessity. A remote server on Red Hat Enterprise Linux had no GUI no nmtui, and I needed to set a static IP address on a newly provisioned interface. That moment kick-started my journey into Linux command-line networking, and what felt intimidating at first became second nature over time
Why nmcli Is a Game-Changer
Automation-Ready – Script tasks and deploy at scale.
Faster than GUIs – No clicks, no menus.
Works Everywhere – From nmcli network configuration Ubuntu to RHEL.
Detailed Feedback – Useful for the nmcli command for network troubleshooting in RHEL.
Getting Started with nmcli: The Basics
nmcli is a command-line interface to NetworkManager. It lets you manage network interfaces, IP settings, routes, DNS, and more without any GUI tools. It’s ideal for sysadmins managing headless servers or automating network changes.
One of the first questions I faced was: What is nmcli and how does it work in CentOS/RHEL?
Simply put, nmcli interacts with the NetworkManager service to view and modify network connections. It’s the CLI equivalent of GUI tools like nmtui, but much more powerful when working on systems like CentOS Stream or RHEL 9, especially in remote or server environments.
Step-by-Step Network Configuration with nmcli
Checking Network Status
Before making changes, check your devices:
nmcli device status
This shows each CentOS network interface name, state, and type. If a device shows as nmcli unmanaged or nmcli device disconnected, you know where to start.
Let’s walk through a step-by-step network configuration with nmcli that I’ve used countless times in real-world setups. The IP command will be used to show device and network address information. The list of commands below will generate different types of customized output of address information.
Static IP Configuration on CentOS Stream & RHEL
Show all interfaces IP address, and Netmask information.
# ip addr
Some options of the ip addr command are shown below. Execute the command below to obtain specific interface information.
# ip addr show
# ip addr show [Device Name ]
Device Name: In Linux, network interfaces can have names such as eth0, eth1, or enp2s0. The naming convention depends on factors like device topology, firmware, and device type. For example, Ethernet interfaces usually start with en, while wireless (WLAN) interfaces typically start with wl.
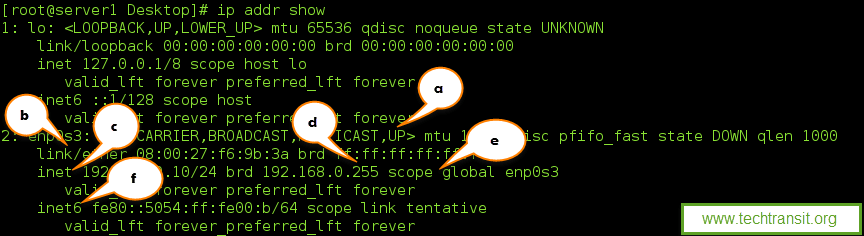
The above command will show all interface device information.
Screenshot by TechTransit.org: Show all interface device information
(a) UP showing as active interface.
(b) MAC address of the device.
(c) Inet line shows the IPv4 and Netmasks or Prefix information.
(d) Broadcast address
(e) Scope and device name are also on the same line.
(f) This will show IPv6 information.
The ip route A command in Linux is used to view and manage the system’s routing table — essentially telling your system where to send network traffic.
Display the current routing table
# ip route
This shows the default gateway, connected networks, and their associated interfaces.
Example output:
default via 192.168.1.1 dev ens33
192.168.1.0/24 dev ens33 proto kernel scope link src 192.168.1.100
Screenshot by TechTransit.org: Show routing information
I’ve used ip route in troubleshooting cases where servers couldn’t reach certain subnets because of incorrect gateway settings. Quickly adjusting the route fixed the issue without rebooting or editing config files.
Network Device Configuration with nmcli and Network Manager
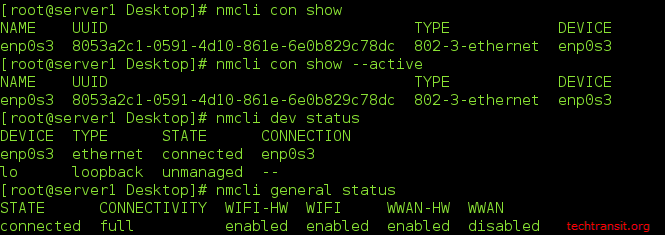
NMCLI General Command and its usages.
(a) The following command will list all connections.
# nmcli con show
(b) Active connection will show with –active option.
# nmcli con show --active
(d) It will show the general status of the Network Manager.
# nmcli general status
Screenshot by TechTransit.org: Show Network Device Information
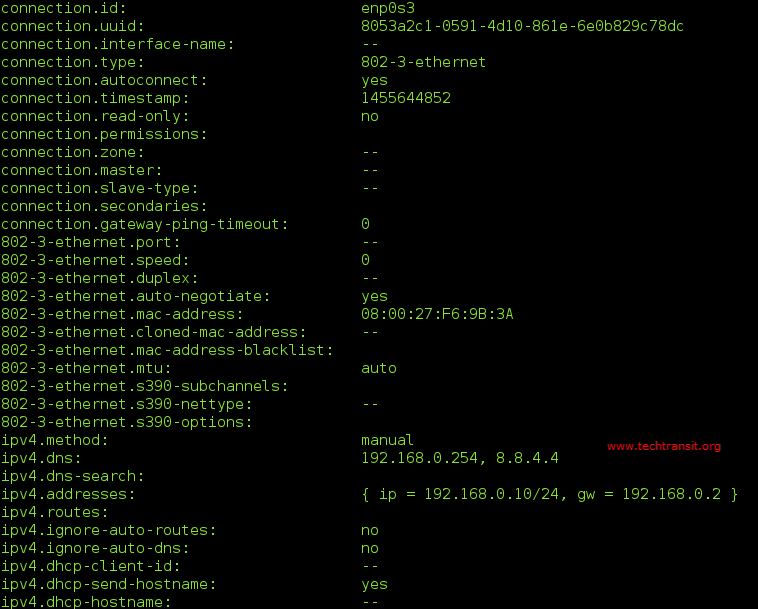
(e) Now nmcli will show the configuration of the connection through below command.
# nmcli con show “CONNECTION NAME or UUID”
The output of below command is completed. some of content screecast image is below.
Add a new IP or update the Network interface information on existing interface with nmcli
Here we are going to update or change IP address on existing active interface. Be careful with live servers before doing this , you should aware what you are doing, it can be lost network connection and lost remote server , you should have good system administrator knowledge.
Turn on autoconnect
Below command will be enable network device on boot .
# nmcli con mod “CONNECTION NAME ” connection.autoconnect yes
Add a DNS Server
# nmcli con mod “CONNECTION NAME” ipv4.dns [DNS IP]
If you want to add one more DNS as a secondary DNS, you can use the +/- operator in the argument, like the command below.
# nmcli con mod “CONNECTION NAME” +ipv4.dns [DNS IP]
Add a manual static IP address and gateway
# nmcli con mod "CONNECTION NAME” ipv4.addresses [IP ADDRESS/PREFIX GATEWAY]
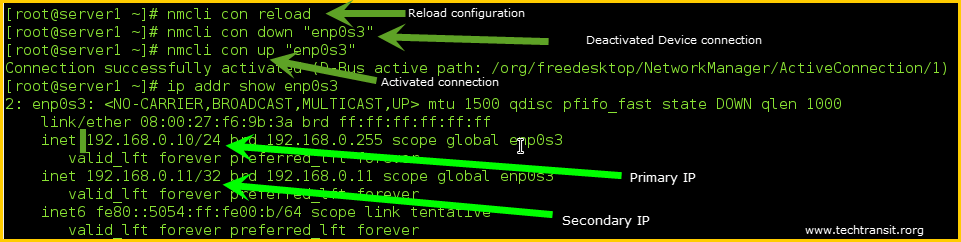
Here, 192.168.0.10 isthe IP Address and 24 is the Prefix or net mask, and 192.168.0.2 is the gateway, which I have set.
If you want to add a secondary IP address without a gateway, you can use as below.
# nmcli con mod “CONNECTION NAME” +ipv4.addresses [IP ADDRESS/PREFIX]
Now if your connection has been done, this command will save your command setting to the configuration, it will reflect and work after the activated or deactivated connection. Here are the reload configuration and activated and deactivated connection commands below.
Wi-Fi Setup with nmcli
Sometimes you need to nmcli connect to wifi instead of Ethernet:
This falls under the network manager CLI configuration guide and is also useful for laptops or cloud images.
Connection vs Device in nmcli
There’s often confusion between the terms “connection” and “device.” A device is the actual hardware (e.g., eth0), while a connection is the profile or configuration associated with it.
I ran into this early on when I edited a device directly and wondered why my changes weren’t persistent. Understanding this difference was key in scripting persistent network setups.
Is nmcli Better Than ifconfig or nmtui?
Having used all three, I can confidently say nmcli offers far more power and flexibility. ifconfig is deprecated and lacks features for modern networking. nmtui is great for simple setups but doesn’t scale well for scripting or automation. In every serious deployment I’ve worked on—especially with Red Hat Enterprise Linux or CentOS Stream—nmcli has been the right tool.
FAQs
Q1: How do I set a static IP in RHEL using nmcli?
A: Follow the steps in the network configuration in RHEL using nmcli section above.
Q2: Can I use nmcli on Ubuntu?
A: Yes, as shown in the nmcli network configuration Ubuntu section, commands are similar.
Q3: Why is my nmcli device disconnected?
A: Check cables, Wi-Fi signals, or whether the device is set as managed.
I’m Sachin Gupta — a freelance IT support specialist and founder of techtransit.org. I’m certified in Linux, Ansible, OpenShift (Red Hat), cPanel, and ITIL, with over 15 years of hands-on experience. I create beginner-friendly Linux tutorials, help with Ansible automation, and offer IT support on platforms like Upwork, Freelancer, and PeoplePerHour. Follow Tech Transit for practical tips, hosting guides, and real-world Linux expertise!