
Last Updated on 3 weeks by Sachin G
If you’ve ever managed multiple Linux servers, you know the pain of installing and configuring MySQL manually on each system. It’s time-consuming, error-prone, and far from scalable. That’s where Ansible comes in — a powerful automation tool that allows you to deploy and configure applications like MySQL across multiple machines with a single command.
Here I am going to demonstrate automating MySQL server installation using Ansible playbooks and roles. This guide walks you through setting up the Ansible environment, utilizing the popular geerlingguy.mysql role, and configuring variables for a seamless deployment.
Automating the installation of MySQL database servers is easy to set up and configure through an Ansible playbook. I have installed and configured the MySQL server using both roles and playbooks, which makes the process simple and repeatable. MySQL, being an open-source relational database, is widely used in Linux-based hosting environments, whether you’re setting up a LAMP (Linux, Apache, MySQL, PHP) or LEMP (Linux, Nginx, MySQL/MariaDB, PHP) stack.
One of the main reasons I recommend Ansible is its ability to keep the application properly deployed and managed throughout its lifecycle. Ansible excels in configuration management, ensuring files, permissions, and deployments remain consistent across all your servers. Whether you’re working on Ubuntu, CentOS, RHEL, or AlmaLinux, this tutorial will show you how to install MySQL database server through an Ansible playbook in a professional, automated, and scalable way.
Prerequisites
Before running the playbook, ensure the following:
- Ansible is installed on your control node (the machine from which you run the playbook).
- Target servers (Ubuntu, CentOS, AlmaLinux, or RHEL) are accessible via SSH.
- You have sudo privileges on the managed nodes.
- Python is installed on the target systems (Ansible requires it).
- Update your Ansible inventory file with the IPs of your database servers.
Ansible Ad-hoc Command :
ansible all -m ping
srv1.techtransit.org | SUCCESS => {
    "ansible_facts": {
        "discovered_interpreter_python": "/usr/libexec/platform-python"
    },
    "changed": false,
    "ping": "pong"
}
ansible all -m command -a ‘id’
Output :

srv1.techtransit.org | CHANGED | rc=0 >>
uid=0(root) gid=0(root) groups=0(root) context=unconfined_u:unconfined_r:unconfined_t:s0-s0:c0.c1023
Ansible Roles
Here we are going to use ansible roles. Roles make it simple to reuse the ansible code. We can manage
code through a standardized directory structure like variables, files, and templates in a folder inside the top-level folder. Files are arranged into sub directories that are named according to the purpose of the role.
Ansible-galaxy is a public role library of ansible code written by community users and administrators. Galaxy contains lots of ansible roles, you can search for any role on ansible galaxy official website https://galaxy.ansible.com. We will import the MySQL role into our main playbook and pass the MySQL variable in our playbook. Galaxy role can be searched through the ansible-galaxy command.
ansible-galaxy search 'mysql
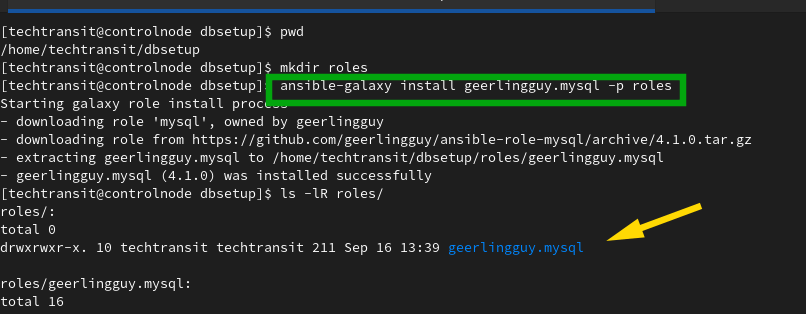
Galaxy search gives lots of output related to MySQL server roles, I have chosen geerlingguy. To set up MySQL server which is for RHEL / CentOS and Debian/Ubuntu. Here I am using the AlmaLinux Operating system in the managed host. Below is the command to download that role.
ansible-galaxy install geerlingguy.mysql -p rolesAbove command will download the role of mysql inside the roles directory. Roles directory is inside the project directory. You can see my directory structure.
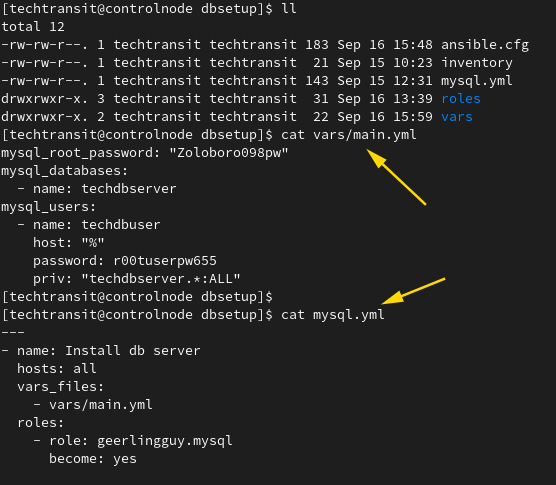
geerllingguy.mysql has been downloaded in roles directory then we will create our main YAML file .which will import this role and pass the environment variable like MySQL root password .Any database, and user and password.
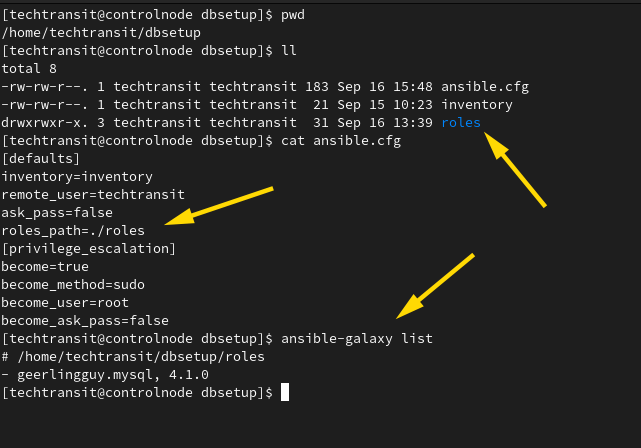
After that we create the vars folder inside the project directory and pass it like root password , the database you want to create, and user and give privilege through the variable.
vars/main.yml
mysql_root_password: "Zoloboro098pw"
mysql_databases:
  - name: techdbserver
mysql_users:
  - name: techdbuser
    host: "%"
    password: r00tuserpw655
    priv: "techdbserver.*:ALL"

After that, I created my main playbook, which will import roles and vars and run into the managed host.
---
- name: Install db server
  hosts: all
  vars_files:
    - vars/main.yml
  roles:
    - role: geerlingguy.mysql
      become: yes
...

Accordingly the complete picture of whole screnario is look like below screenshot.
Now we can run our playbook to our managed host . So checked and run this playbook through the below command.
ansible-playbook Playbook_name.yml
Below screenshot showing changes made in the managed host.

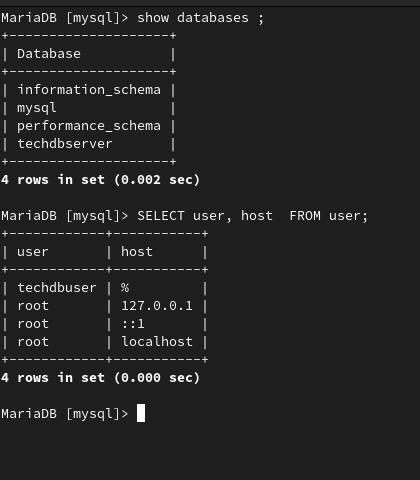
Accordingly the playbook create user password from variable . Log in to managed host machine like below screenshot and check the MySQL root password is working.
Below in a screenshot some commands to verify the database and user . As a result we configure mysql database server through ansible playbook.
Automating MySQL Installation for Multiple Servers
One of Ansible’s biggest strengths is scaling. You can add dozens of IPs under the [db_servers] group in your inventory file and run the playbook once to set up all servers.
Real-world scenario: Many DevOps teams use this approach when deploying database clusters or replicated environments for applications.
Best Practices for Ansible MySQL Setup
- Use Ansible Vault to store MySQL passwords securely.
- Always test your playbook in a staging environment before production.
- Use roles for modular playbooks (e.g.,
roles/mysql/tasks/main.yml). - Implement idempotency checks to avoid unnecessary changes.
- Keep your playbook organized with
handlersfor restarting services only when needed.
Automating MySQL installation with Ansible is a game-changer for system admins and DevOps engineers. It saves time, reduces human error, and ensures consistency across your infrastructure.
Learn Smarter. Level Up Faster →
Want to master Linux, DevOps, Ansible, or Cloud workflows the smart way? I’ve curated a list of top-rated, real-world Udemy courses — based on student reviews and practical feedback.
Visit the Recommended Courses page to explore and enroll in courses trusted by the community.
See Curated Courses →
I’m Sachin Gupta — a freelance IT support specialist and founder of techtransit.org. I’m certified in Linux, Ansible, OpenShift (Red Hat), cPanel, and ITIL, with over 15 years of hands-on experience. I create beginner-friendly Linux tutorials, help with Ansible automation, and offer IT support on platforms like Upwork, Freelancer, and PeoplePerHour. Follow Tech Transit for practical tips, hosting guides, and real-world Linux expertise!