
Last Updated on 3 months ago by Sachin G
Installing Red Hat Enterprise Linux (RHEL) 10 might sound intimidating if you’re new to Linux system administration. But trust me, once you walk through the process step by step, it becomes just another skill in your sysadmin toolkit. I’ve been working with Linux and enterprise hosting for over a decade, and I still remember my first RHEL installation — it felt like unlocking the door to the “serious” world of Linux used in production environments. In this guide, I’ll show you how to install RHEL 10 step by step with screenshots.
Whether you’re trying it on bare metal hardware, inside a VirtualBox or VMware environment, or setting up a dual boot with Windows, this tutorial covers it all. By the end, you’ll have a fully functional Red Hat Enterprise Linux 10 system — the same edition used in corporate data centers, thanks to Red Hat’s free Developer Subscription.
Why Install RHEL 10?
Before diving into the steps, let’s answer the most common question: Why RHEL 10 and not another Linux distro?
- Production-Grade Reliability – RHEL is used by enterprises globally for mission-critical workloads.
- Free Developer Subscription – Red Hat lets individuals download and use RHEL at zero cost for development, testing, and learning.
- Consistency Across Environments – What you test on your laptop will behave the same way on production servers.
- Enterprise Support (Optional) – When you’re ready for production, Red Hat provides enterprise-grade support, patches, and compliance.
Personal note: In hosting and DevOps projects, running test workloads on RHEL has saved from countless “surprise bugs” during deployment. What you build on RHEL Developer Edition is what you’ll get in production.
New in RHEL 10: LightSpeed AI Assistant
One of the most exciting reasons to try RHEL 10 is Red Hat LightSpeed AI, a new feature integrated directly into the command line. Unlike a chatbot in the browser, LightSpeed is built right into your sysadmin workflow, making day-to-day tasks faster and smarter.
Here are a few real-world examples of what it can do:
Diagnose Issues Instantly
Instead of digging through log files manually, you can ask:
cla "diagnose slow boot issue"LightSpeed will return possible causes, log file paths, and even suggest commands like systemd-analyze.
Automate Software Setup
Want to install Nginx and make sure it runs at boot?
cla "install nginx and enable at startup"LightSpeed outputs a ready-to-run script and explains each line.
Generate Scripts on the Fly
Need a backup script with today’s date in the filename?
cla "create bash script to backup /etc with today’s date"LightSpeed outputs a ready-to-run script and explains each line.
Analyze Processes in Real Time
Combine Linux commands with AI:
ps aux | claInstead of staring at a wall of output, LightSpeed highlights unusual CPU hogs or anomalies.
This isn’t just an AI “toy” — it’s built on Red Hat’s years of enterprise Linux expertise, and integrates with tools like Image Builder and OpenShift Console.
For sysadmins, students, or developers new to Linux, LightSpeed lowers the learning curve dramatically. For experienced admins, it saves time by turning tribal knowledge into on-demand guidance.
Step-by-Step Guide: Install Red Hat Enterprise Linux 10
In this tutorial, you’ll learn exactly how to install Red Hat Enterprise Linux 10 step by step with screenshots.
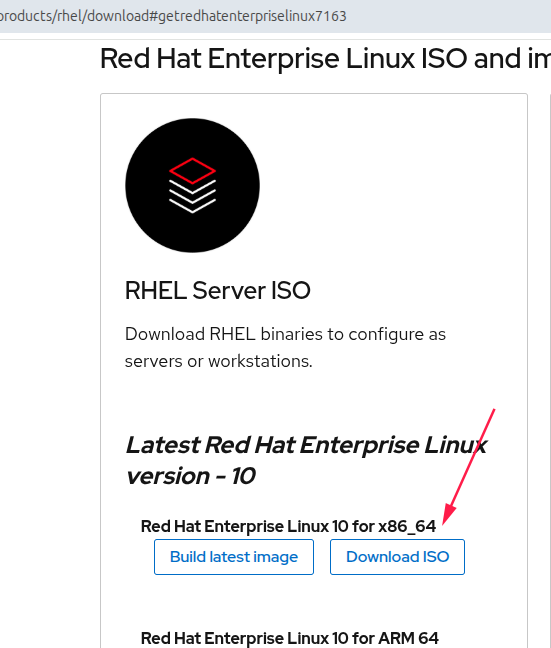
Step 1: Download RHEL 10 ISO
- Go to the Red Hat Developer Program.
- Sign up with your email ID (a personal one works fine).
- Choose the Individual Developer Subscription – it’s completely free.
- Navigate to the RHEL 10 downloads section.
- Download either:
- Boot ISO (small, downloads packages during install), or
- DVD ISO (full installer with all packages).
Step 2: Create a Virtual Machine or Boot USB
Option A: Install on VirtualBox / VMware
- Open VirtualBox or VMware Workstation.
- Click New VM → Name it
RHEL 10. - Choose Linux → Red Hat (64-bit).
- Allocate resources:
- RAM: 2–4 GB
- Disk: 20–40 GB
- Attach the downloaded ISO to the VM’s optical drive
Option B: Install on Bare Metal
- Burn the ISO to a bootable USB using Rufus or
ddcommand in Linux
sudo dd if=rhel-10.iso of=/dev/sdX bs=4M status=progress2. Reboot your PC and boot from the USB drive.
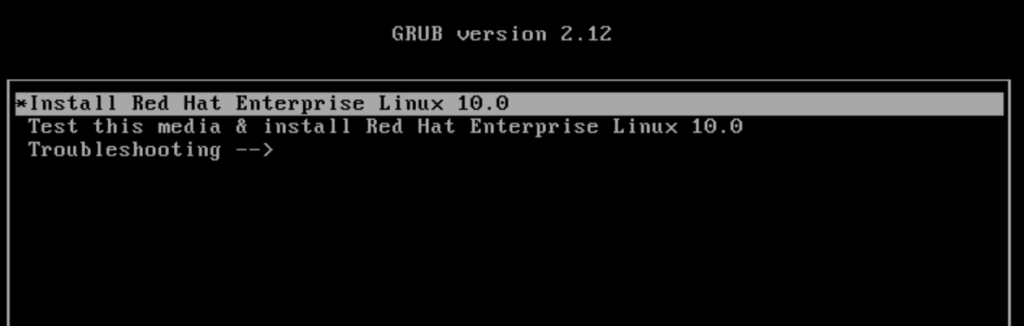
Installer walkthrough — where people get stuck (detailed)
When you boot the RHEL 10 installer and click Install Red Hat Enterprise Linux 10, the graphical installer launches. The installer presents several configuration cards: Language, Time & Date, Keyboard, Network & Hostname, Installation Destination (disk partitioning), Software Selection, Security Policy, Root Password & User. I’ll walk through these cards in the order they appear and explain each decision you’ll need to make.
Language & Keyboard (Locale)
Why it matters: Locale settings affect system messages, date/time formats, character encodings, and application behavior. Keyboard layout affects login and installer text entry.
What to set in the installer:
- Language: Choose the language you are comfortable reading (English (United States) is common for server installs).
- Keyboard: If you use a non-US keyboard (UK, DE, IN, etc.), set the appropriate layout now — otherwise you might type the wrong root password later.
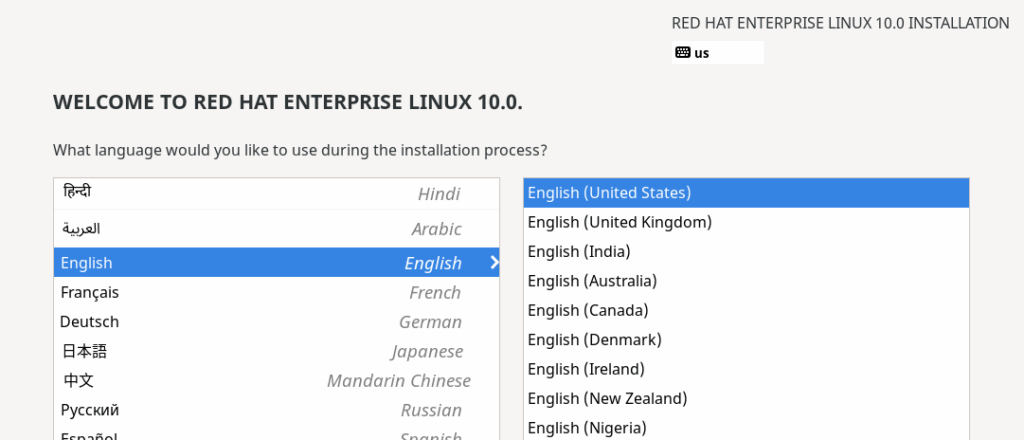
Why choose correctly: Choosing the wrong keyboard layout is a common source of frustration because your typed password might not match what you think you typed at the login screen.
Verification (post-install):
localectl status
localectl set-locale LANG=en_US.UTF-8 # to change locale
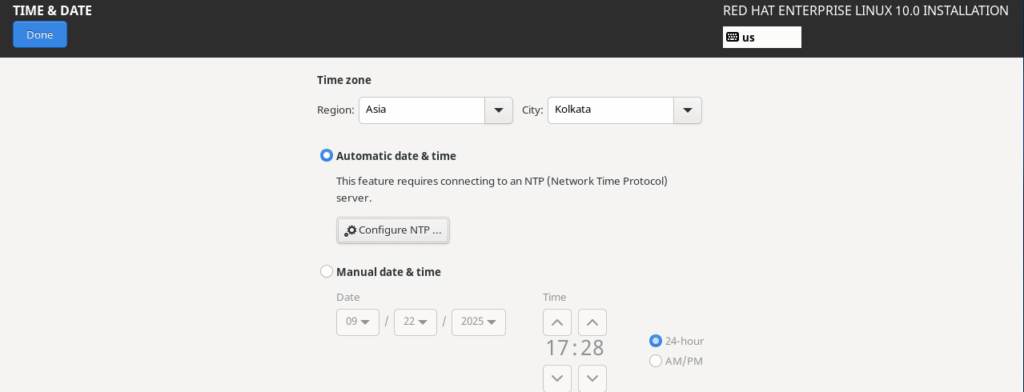
localectl set-keymap us # to change keyboard layoutTime & Date (Timezone & NTP)
Why it matters: System time affects log timestamps, certificate validity, cron jobs, and Kerberos/LDAP authentication. For servers, using NTP (network time sync) is essential.
Installer options:
- Timezone: Select your timezone (e.g.,
Asia/Kolkataif you’re in India). - Network Time Protocol / Set time automatically: Check or enable this if you have network access.
Commands (post-install):
# Show current settings
timedatectl status

# Set timezone (example)
sudo timedatectl set-timezone Asia/Kolkata

# Enable NTP (chrony is default on RHEL)
sudo timedatectl set-ntp true
sudo systemctl enable --now chronyd
Tip: If you have no network during install, set the timezone manually and enable NTP after first boot.
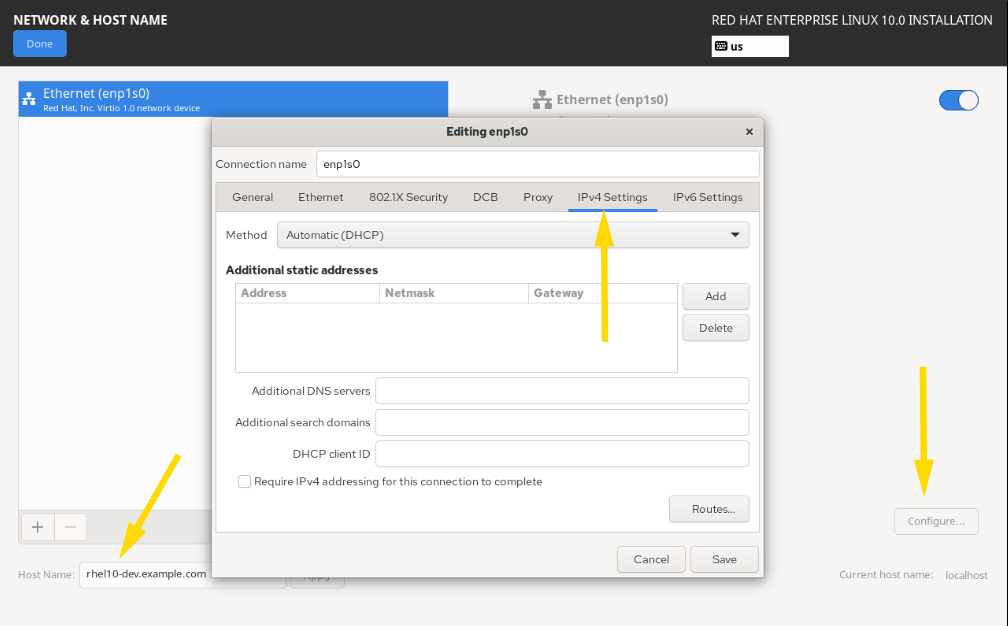
Network & Hostname
Why it matters: For servers, set a static IP, correct hostname, and DNS during install. Network connectivity is also required if you want to register the system to the Red Hat Developer subscription during the install.
Options in the installer:
- Enable network interfaces: Turn on the interface you plan to use.
- Hostname: Set a meaningful FQDN like
rhel10-dev.example.com(orrhel10.localif internal). - DHCP vs Static: For development VMs, DHCP is fine. For production or lab servers, set a static IPv4 with gateway and DNS.
GUI steps (common):
- Click Network & Hostname.
- Toggle the interface ON.
- Click Configure → IPv4 Settings → Manual → Add address (
192.168.1.50/24), gateway, DNS (8.8.8.8). - Set Hostname in the field at the top and click Apply.
Command-line network configuration (nmcli examples):
# List connection names and device
nmcli connection show

# Example: set static IPv4 on an existing connection named "Wired connection 1"
nmcli connection modify "Wired connection 1" ipv4.addresses 192.168.1.50/24 ipv4.gateway 192.168.1.1 ipv4.dns "8.8.8.8 8.8.4.4" ipv4.method manual
nmcli connection up "Wired connection 1"

# Set hostname
sudo hostnamectl set-hostname rhel10-dev.example.com
Best practice: Use a static IP for servers and ensure DNS reverse records exist if your environment relies on reverse lookups.
Installation Destination (Disk selection & Partitioning)
One of the most important parts of learning how to install Red Hat Enterprise Linux 10 is configuring your disk partitions correctly.This is the big one. Partitioning decisions differ depending on whether you’re installing in a VM, bare metal, or doing a dual boot with Windows. The installer offers Automatic (default) or Custom partitioning. I’ll cover both in depth.
Automatic Partitioning — quick and safe for new users
- The installer will create recommended partitions (using LVM by default on RHEL) and set up
/boot,swap, and a logical volume group for/and/home. - Good for: VMs, testing, or if you don’t need custom mount points.
Automatic limitations: Less control over where /var lives, encryption, separate /boot, or special filesystem choices.
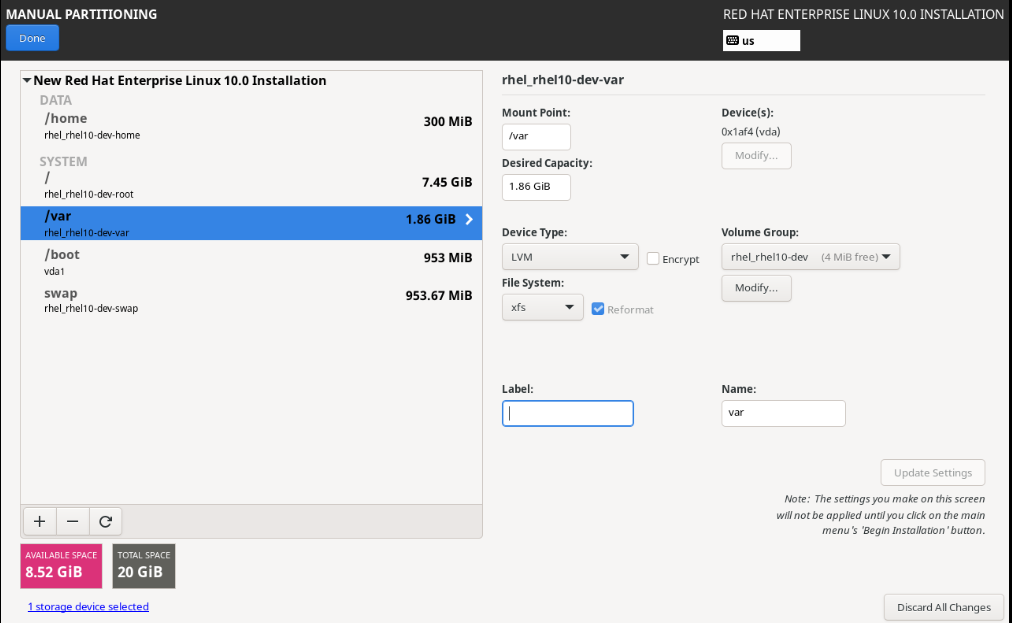
Custom Partitioning — for advanced control (recommended for servers & dual-boot)
If you need control (dual boot, RAID, LVM layout, encryption), choose Custom.
Key partitioning concepts to decide:
- UEFI vs BIOS: Modern systems use UEFI and require an EFI System Partition (ESP) — a FAT32 partition (512MB) mounted at
/boot/efi. BIOS systems use an MBR or a BIOS boot partition. - /boot: Separate /boot (1 GB) is a good practice, especially when using LUKS encryption on root.
- / (root): Minimum 20–40 GB for a server; larger if you install many packages.
- /home: If you separate user data, allocate based on expected usage.
- /var: For servers running databases, web servers, or mail, put
/varon a separate partition to prevent logs or caches filling root. - swap: Guidelines:
- If you plan to use hibernation, swap >= RAM.
- Otherwise, swap = 1–2 GB for small systems, or 1 × RAM up to ~8 GB for typical servers.
- Filesystem: RHEL defaults to XFS for large filesystems; use XFS for root and large partitions. Ext4 is available if you prefer it.
- LVM (Logical Volume Manager): Lets you create volume groups and logical volumes that can be resized. Recommended for servers.
- Encryption (LUKS): Encrypting the root volume is recommended for laptops or sensitive data. Note: encrypted boot requires separate unencrypted
/boot.
Example custom partition plan (UEFI system for a server):
/boot/efi— 512 MB — FAT32 — ESP flag/boot— 1 GB — ext4 (or xfs small partition)vg_rhel(LVM VG)lv_root— 40 GB — XFS — mount/lv_var— 20 GB — XFS — mount/varlv_home— 30 GB — XFS — mount/homelv_swap— 8 GB — swap
Creating encrypted LVM for root (via installer):
- In custom partitioning, select your device, choose to create LVM volumes, and enable encryption (LUKS) for the volume group. Enter a passphrase you’ll remember.
Step-by-step GUI (custom partitioning):
- Click Installation Destination → Select drive → Click Custom.
- Click Done → Click Create.
- Add a partition for ESP (if UEFI): size 512 MB, file system FAT32, mount point
/boot/efi, set boot flag. - Add
/bootpartition 1 GB (ext4). - Create an LVM physical volume on the remaining space and create a VG, then create LVs for
/,/var,/home, andswap. - Optionally enable encryption on the LVM.
- Review mount points and file system choices → Click Done.
Command-line partitioning (example with parted & LVM)
NOTE: Manual partitioning from a live shell is powerful but error-prone. Always backup first.
Software Selection & Add-Ons
Choose the desired package set: Server (with GUI), Minimal, Custom server etc. Pick tools you’ll need: web server, development tools, virtualization tools.
Tip: If you plan to use the system as a headless server, choose Minimal and add packages later with dnf
Root Password & User Creation
- Root password: Choose a strong password and store it safely.
- Create user: Create an administrative user (wheel group) for daily work. Avoid using root for routine tasks.
Commands to add a sudo user post-install:
sudo useradd -m -G wheel deployer
sudo passwd deployer
Security Policy & Additional Options
RHEL installer may present security profiles or compliance options. For learning and general installs, defaults are usually fine; for hardened production deployments, choose an appropriate security profile (CIS, DISA, etc.) during or after install.
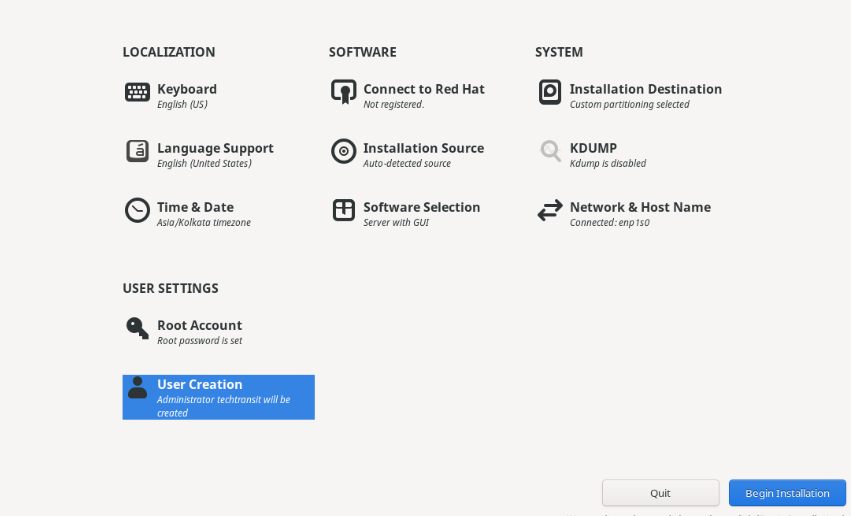
Begin Installation — what happens next (installer internals)
When you click Begin Installation, the installer:
- Writes partition tables and formats file systems.
- Installs the base system packages you chose.
- Configures GRUB and bootloader (for UEFI, installs boot files in EFI partition).
- Drops you to a progress screen showing package installs.
Tip: If you enabled system registration during install, the installer will attach your system to the Red Hat Developer repositories so packages can be pulled during install.
Verifications & Troubleshooting before reboot
Before rebooting, if the installer provides a summary, double-check:
- The network is enabled, and the hostname is correct.
- Filesystems and mount points are correct (
/booton a separate partition?/boot/eficreated for UEFI?). - If encryption is used, ensure the passphrase is stored safely.
- If you planned to dual-boot with Windows, confirm that the Windows partition was not chosen for formatting.
Common errors to watch for:
- Installer can’t register: Check network and proxy settings.
- Boot issues after install: Missing ESP or GRUB misconfiguration — recheck ESP and verify bootloader device.
After reboot — initial checks & commands
Once the system boots into RHEL 10:
Check release & kern
cat /etc/redhat-release
uname -r
Verify disks & mount points
lsblk -f
df -hT
blkid
Verify network & hostname
ip addr show
nmcli device show
hostnamectl status
Register with Red Hat (if you didn’t during install)
sudo subscription-manager registersudo subscription-manager attach --auto
sudo dnf update -yEnable & check time sync
timedatectl status
sudo systemctl enable --now chronyd
Install common tools
sudo dnf install -y vim git curl wget policycoreutils-python-utilsReal-world lessons & common mistakes (third-person perspective)
- Many administrators forget to choose the correct keyboard layout, then type a password that doesn’t match — causing access frustration.
- Skipping /var separation on mail/web servers can result in full root filesystems when logs grow.
- Forgetting to configure an ESP on UEFI systems causes GRUB failure on reboot — always ensure
/boot/efiexists when installing in UEFI mode. - Not setting the correct timezone can make logs and monitoring alerts confusing across a team.
Example: Dual-boot notes (Windows + RHEL 10)
- Shrink Windows partition first from Windows Disk Management.
- During RHEL custom partitioning, use the freed space — do not reformat the Windows partition.
- Install GRUB to the primary disk; it will detect Windows and add a boot entry.
Warning: If Windows uses BitLocker, suspend or decrypt before repartitioning.
FAQ :
Boot from rescue media, mount your installed root, reinstall GRUB, and verify the ESP exists (UEFI) or MBR installs (BIOS).
If you need hibernation: swap >= RAM. Otherwise, 1–2 GB or a size proportional tothe workload is common.
RHEL uses XFS for general-purpose filesystems. XFS scales well and is recommended for root and large partitions. For specific use cases, ext4 may be chosen.
Yes — use the full DVD ISO. However, you’ll miss registration and updates until the network is available.
Use custom partitioning during installation and let GRUB handle dual-boot setup.
Yes, with a free Red Hat Developer Subscription. It’s for development, testing, and learning, not production.
Congratulations! Now you know how to install Red Hat Enterprise Linux 10 successfully, from creating boot media to setting up users and networking. Whether you’re running it in a virtual environment, on bare metal, or as a dual boot, you now have hands-on experience with the same OS trusted by enterprises worldwide.
Now you know how to install Red Hat Enterprise Linux 10. If you’d like to compare it with the previous version, here’s my guide on RHEL 9 installation.

I’m Sachin Gupta — a freelance IT support specialist and founder of techtransit.org. I’m certified in Linux, Ansible, OpenShift (Red Hat), cPanel, and ITIL, with over 15 years of hands-on experience. I create beginner-friendly Linux tutorials, help with Ansible automation, and offer IT support on platforms like Upwork, Freelancer, and PeoplePerHour. Follow Tech Transit for practical tips, hosting guides, and real-world Linux expertise!