
Last Updated on 11 months ago by Sachin G
For system administrators and Linux users, forgetting the root password can be a serious roadblock. Fortunately, distributions like CentOS Stream, CentOS, and AlmaLinux provide ways to recover access without reinstalling the operating system. You’ll learn how to reset the forgotten root password of CentOS Stream Alma Linux using single-user mode, GRUB, or rescue mode — all without reinstalling your system. Let’s identify the common causes, explore the recovery steps, and walk through tested commands that regain root access safely.
Why Would You Need to Reset the Root Password?
The root password may be forgotten due to infrequent use, change by another administrator, or lost credentials during system migration. Without it, essential tasks like installing packages or configuring firewalls become inaccessible.
We have got many changes in CentOS Stream or RHEL Versions from old versions. One of the many changes GRUB 2 version. Every Linux system administrator should know the reset the lost root password.
Different methods are available to reset new root passwords by Live CD or editing shadow files or mount the root file system. Here we are doing this not through any external media.
Below is the procedure to reset the root password if we forget or lose our root password in CentOS Stream or RHEL, and Alma-Linux Versions.
Use the procedure below carefully. Mistakes can make your machine unstable. First, try l test the machine at your own risk.
How to Reset Forgotten Root Password in CentOS Stream Alma Linux
Prerequisites and Considerations
Before proceeding, ensure you have physical or virtual machine access. You won’t be able to do this over Remote Access (e.g., SSH) unless you’re already logged in as another user account with sudo privileges. This article also applies to servers hosted for Web Hosting, Web Server, or Load Balancer purposes.
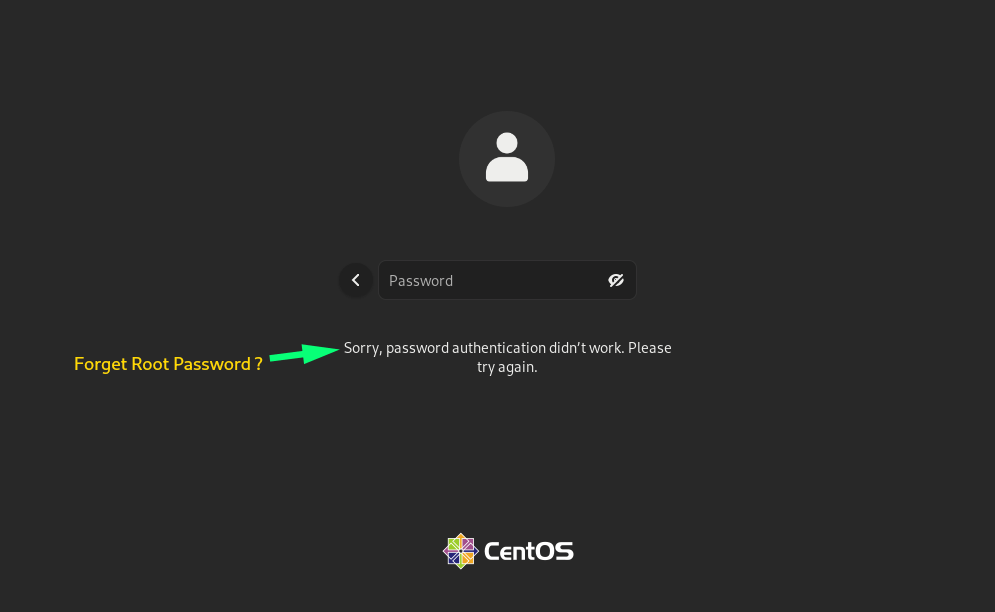
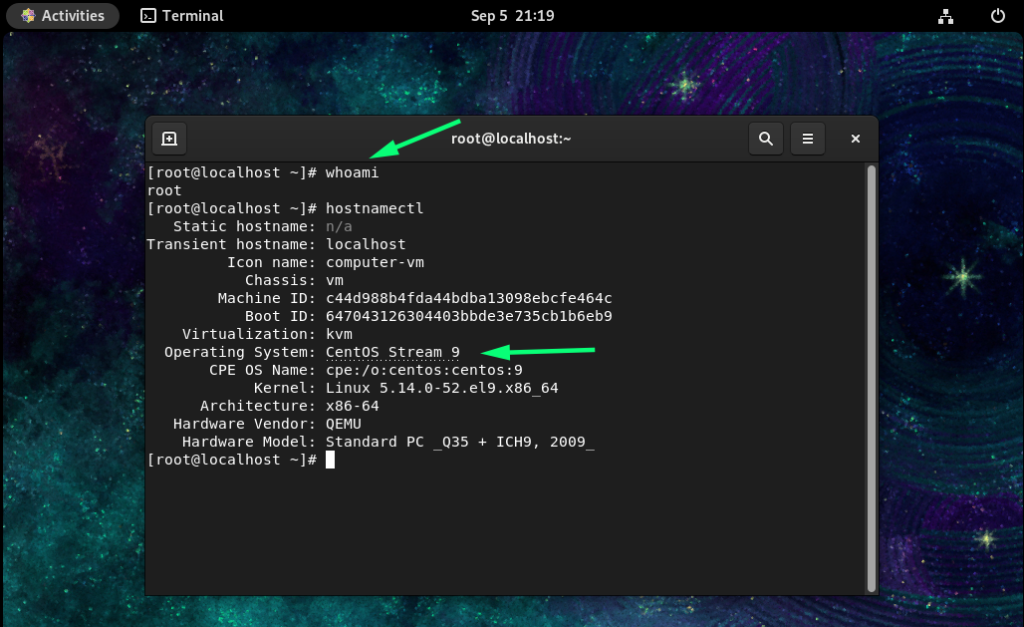
Show Forget root password and reboot the CentOS server
The below snapshot shows the screen where user root is trying to log in with the last remembered password but is not successful in logging in through the GUI. Similarly, this will be implemented as a command line interface.
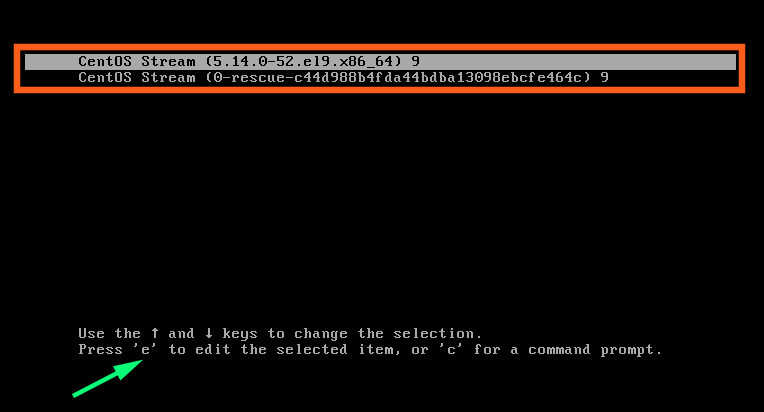
Accessing the GRUB Menu
To begin, reboot your Linux server and hold or tap the arrow keys repeatedly during the boot process to access the GRUB menu.
- When the GRUB screen appears, highlight the default kernel using the arrow keys.
- Press
eto edit boot parameters.
Modify Kernel Parameters for Recovery
Locate the line that starts with linux or linux16. Move to the end of the line, find the rhgb quiet entry, and replace it with rd.break .
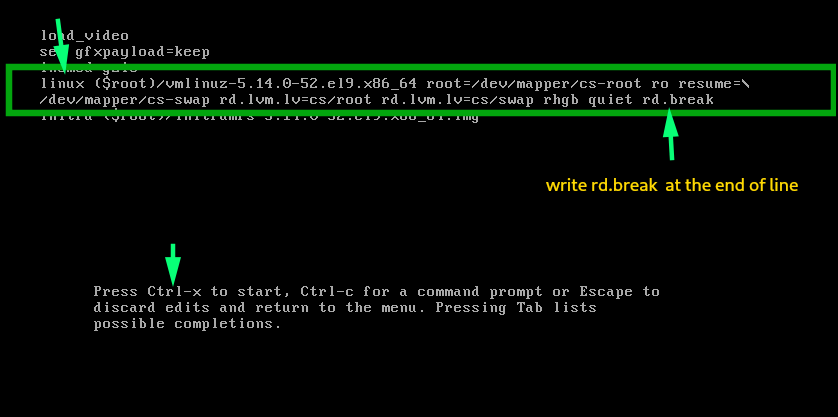
This change allows the system to enter a shell environment with write access to the root file system.
- Press Ctrl + x or press Enter to boot with the modified parameters.
Enter the Chroot Environment
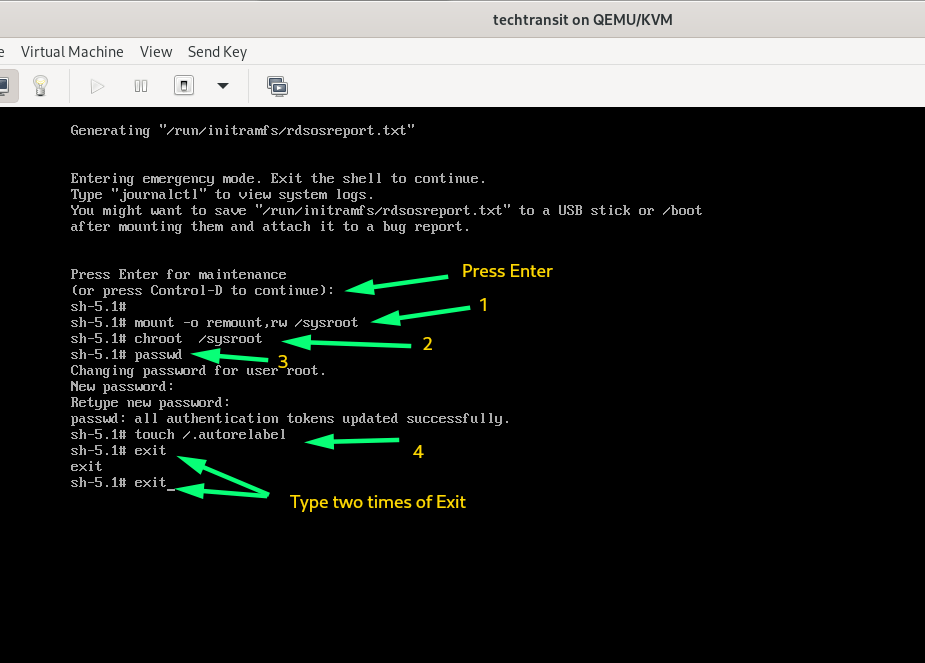
Once the system reaches a minimal shell (you’ll see a shell prompt), run the following command to switch to the root environment:
Reset the Forgotten Root Password
Now the Emergency shell mode or rescue shell mode will available for resetting the password.
First, we will remount the sysroot file system in read and write mode. Then use chroot to got into a chroot jait at /sysroot through the below commands.
# mount –o remount,rw /sysroot
# chroot /sysroot
Now we will give passwd command in the command line and press the same password twice for reset root password.
Relabel SELinux Contexts (If Applicable)
If SELinux is enabled on your system, you’ll want to relabel the file contexts so everything works smoothly after reboot. Use: Finally, ensure that all unlabeled files (including shadow) get relabeled during boot with the command below.
# touch /.autorelabel
This ensures SELinux restores correct permissions on the next boot.
Reboot the System
Type exit two times after running the autorelable activity. The first will exit the chroot jail, and the second will exit the initramfs debug shell.
Find below all the command history that we use to reset the password.
Now we have to reset the password of root. After exiting two times system will boot again and check given root credentials is working properly.
I have got root screen .. 🙂
Important Tips and Best Practices
- Always store SSH keys securely and consider setting up secondary authentication.
- Avoid relying solely on the root account—create an administrative user account with sudo access.
- Keep track of your credentials, especially in environments like Red Hat Enterprise Linux or Rocky Linux 8.
- Be aware of disk space and network interface limitations in minimal boot environments.
- Make these changes during planned maintenance or off-peak hours for real-time servers.
FAQs (Structured for SEO and Readers)
Yes. You can reset the password using the GRUB menu or rescue mode without reinstalling or losing any data.
Single-user mode is a minimal shell environment used for maintenance. It allows you to bypass the usual login process and execute critical system commands.
You’ll need the GRUB password or boot from external media like an ISO to enter rescue mode.

I’m Sachin Gupta — a freelance IT support specialist and founder of techtransit.org. I’m certified in Linux, Ansible, OpenShift (Red Hat), cPanel, and ITIL, with over 15 years of hands-on experience. I create beginner-friendly Linux tutorials, help with Ansible automation, and offer IT support on platforms like Upwork, Freelancer, and PeoplePerHour. Follow Tech Transit for practical tips, hosting guides, and real-world Linux expertise!