Last Updated on 1 month by Sachin G
One common but fixable problem is not optimizing the LoginGraceTime SSH setting. Left on default, it can open your system to unnecessary risk. This article explores what LoginGraceTime is in SSH, why it matters, and exactly how to set LoginGraceTime in SSH config for better protection, whether you’re running Ubuntu, CentOS, or even managing a WHM/cPanel setup.
SSH is one of the most common ways to access Linux servers remotely—but it’s also one of the most targeted. It is a protocol that provides secure remote access to servers over an unsecured network. It encrypts data during transfer, preventing eavesdropping and unauthorized tampering. So improper configuration of SSH settings can systems vulnerable to brute force attacks on the server. It is very important to harden the SSH configuration for the most effective security. In SSH Configuration, there is one important setting is LoginGraceTime, which can prevent SSH login attempts mostly by bots trying to brute-force access & specify the time allowed for successful authentication to the SSH server.
What Is LoginGraceTime in SSH?
When you start the SSH connection, the server makes a temporary connection and you will have some set of time to provide valid credentials like username and password or an authentication key, to complete the login process. The LoginGraceTime parameter works here in this window.
A long-time of LoginGraceTime offers more time to authenticate, but it can also generate a vulnerability. Malicious activity can exploit this extended window to initiate brute-force attacks and retry with different login attempts in hopes of cracking the password.
LoginGraceTime is a directive in the SSHD config file that defines how long the SSH server will wait for a user to authenticate before terminating the session. Think of it as a built-in SSH timeout setting designed to block idle or failed login attempts.
So, why use LoginGraceTime SSH?
- It limits how long a potential attacker can stay connected.
- It reduces the window for automated bots during brute-force attacks.
- It enforces SSH authentication delay, increasing security.
By adjusting this parameter, you directly influence the SSH login timeout, a core component of your SSH server security strategy.
Why This Is a Real-World Problem for Linux Sysadmins
By default, Linux installations come with LoginGraceTime set to 120 seconds. That means any SSH session—even a bot—can stay connected for two full minutes before getting kicked out. During this time, multiple login combinations can be attempted.
This becomes a serious issue when:
- You’re getting flooded with failed logins in your logs.
- You’re using cloud instances on providers like DigitalOcean, SSH, or AWS, Cloud VPS .
- You’re managing multiple Ubuntu SSH or CentOS server instances.
Benefits of Set LoginGraceTime
Setting the LoginGraceTime parameter to a small number minimizes the risk of a brute force attempts on the SSH server. This will make it much more complex for attackers to gain access to the server. This will also limit the number of concurrent unauthenticated connections.
Below is a list of the benefits :
- Small Attack Window minimizes the time attackers
- Shorter timeouts lead to quicker identification of suspicious activity.
How to Set LoginGraceTime in SSH Config
Step-by-step guide (works on Debian, Ubuntu, CentOS, etc.) : Here’s how to set LoginGraceTime on most Linux systems:
Step 1: Edit the SSH Configuration File
Open a terminal window. Use a text editor (like vi /vim or nano ) to edit the SSH configuration file, typically located at /etc/ssh/sshd_config
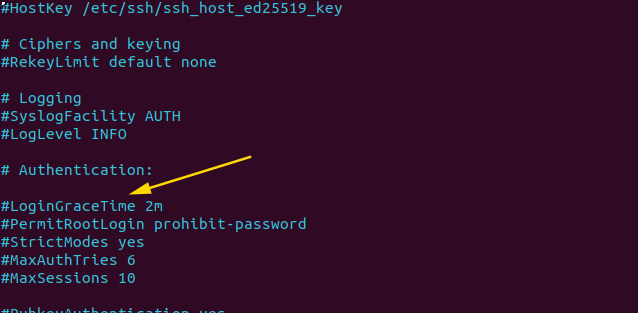
sudo nano /etc/ssh/sshd_configStep 2: Search the LoginGraceTime Parameter
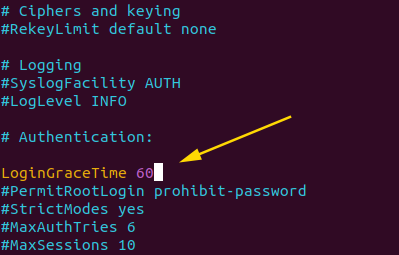
In the configuration file, locate or add the directive for the LoginGraceTime parameter. if it is commented, then remove the “#” symbol to enable it by default, it is commented out.

Step 3: Set the Desired LoginGraceTime Value
Now change the value after “LoginGraceTime” in seconds . A common value is between 30 and 60 seconds .This allows authorized users sufficient time to authenticate .

Step 4: Save and Restart the SSH Service
After making changes in the SSH Configuration file, exit from the text editor and restart the SSH service to apply the new settings using the below command. The restart command may different depending on your Linux distribution.
sudo systemctl restart sshd
This process works across most Linux distributions, including Debian server, Ubuntu SSH, and CentOS server setups.
If you use a control panel like cPanel or WHM, the process is the same, but ensure you have root access to modify /etc/ssh/sshd_config.
Tip: Always keep another SSH session open when making changes. A misconfigured file can lock you out.
Best LoginGraceTime Value for SSH Security
There’s no universal number, but here’s a guide:
- 20 seconds: Best balance for most systems.
- 10 seconds: High-security environments with low latency.
- 5 seconds or less: Risk of timing out legitimate users.
- 60–120 seconds: Too generous for production.
Secure SSH LoginGraceTime Settings for Server Hardening
When implementing SSH hardening with LoginGraceTime, it’s smart to pair it with other key settings in your sshd_config parameters:
MaxAuthTries 2– Prevents repeated guessing.
PermitRootLogin no– Disables direct root access.
AllowUsers youradminuser– Limits who can connect.
UseDNS no– Reduces unnecessary delays.
Together, these parameters create a secure foundation for Linux server security.
SSH Security Best Practices
For students or new Linux users, SSH can feel intimidating. Here’s a simplified checklist to secure SSH login timeout and access:
- Always update your server.
- Change SSH default port if needed.
- Set
LoginGraceTimeto 20 seconds.
- Use key-based authentication.
- Limit users and remove unused ones.
If you’ve been wondering how does LoginGraceTime improve SSH security, the answer is clear: it shortens the opportunity window for attackers, limits exposure, and complements other SSH security layers. It’s a beginner-friendly setting with powerful implications—and now you know exactly how to use it.
If you want to read more information about how to install Ubuntu 22.04 .Just visit Guide to Installing Ubuntu 22.04

I’m Sachin Gupta — a freelance IT support specialist and founder of techtransit.org. I’m certified in Linux, Ansible, OpenShift (Red Hat), cPanel, and ITIL, with over 15 years of hands-on experience. I create beginner-friendly Linux tutorials, help with Ansible automation, and offer IT support on platforms like Upwork, Freelancer, and PeoplePerHour. Follow Tech Transit for practical tips, hosting guides, and real-world Linux expertise!
