Last Updated on 2 months by Sachin G
This guide explains how to integrate Nginx with cPanel/WHM using the NGINX Manager. It covers installing Nginx as a reverse proxy with caching capabilities, enhancing website performance, and handling high-traffic loads effectively.
Nginx is open-source and renowned for its speed and efficiency, stands out as a top choice for web server software. Integrating Nginx with cPanel WHM servers can significantly enhance website performance and handle high-traffic loads more effectively. Earlier this functionality was not available on whm/cpanel. Now Nginx WHM / cPanel is available with Reverse proxy with caching.
This article walks you through the steps of installing on your cPanel server using WHM’s NGINX Manager.
Exploring the Key Features of NGINX on cPanel / WHM Server
Reverse Proxying: It excels in acting as a reverse proxy, efficiently managing and distributing incoming traffic to backend servers.
Caching: With robust caching mechanisms, it enhances website performance by storing frequently accessed content for quick retrieval.
Web Serving: serves as a powerful web server, handling requests and delivering content with speed and efficiency.
Nginx Manager is the interface in WHM provided to manage caching on all user accounts. You can manage Caching, Reverse proxy, and service through from manager
Prerequisites:
Access to WHM cPanel Server: Ensure you have a WHM Web Interface Login server with root privileges.
Backup: Perform a full backup of your server before proceeding with any significant changes to ensure data safety.
Step-by-Step Guide to Installing and Managing Nginx on cPanel WHM
Step 1: Access cPanel WHM Dashboard & Navigate Manager
Log in to your WHM cPanel dashboard using your administrator root credentials. Once logged in, navigate to the “Software” section in WHM and locate the “NGINX Manager” option.
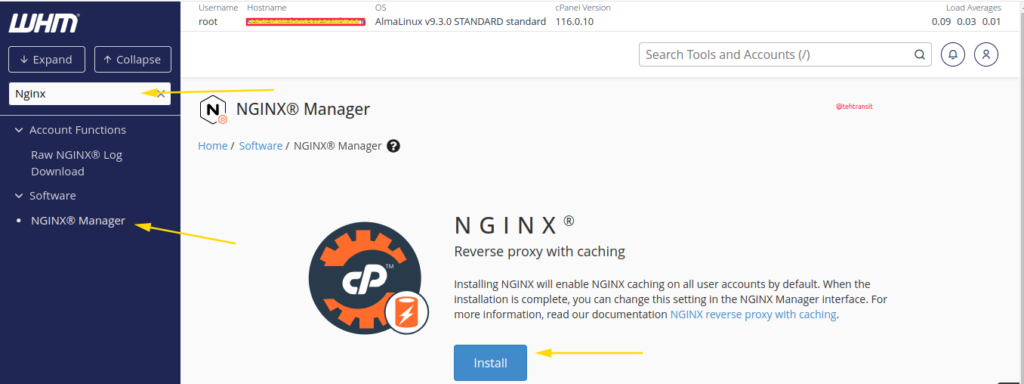
Step 2: Install Reverse proxy with caching
Click on the “NGINX Manager” option and follow the prompts to install . This process may involve accepting license agreements and confirming installation settings.
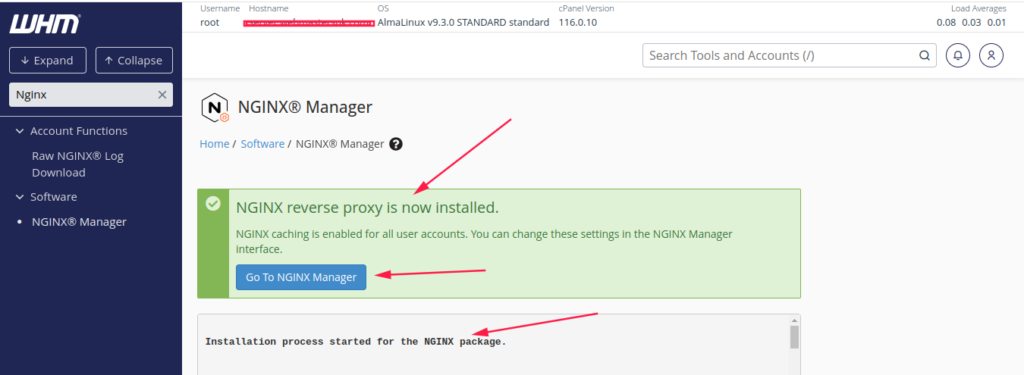
Step 3: Enable Reverse Proxy Functionality
After installing the Manager, You can click on Go to Manager as in the above screenshot or Navigate to its settings or configuration page within cPanel WHM. Look for options related to reverse proxy functionality and enable them as per your requirements.
There are two tabs available one is System Settings and the other is User Settings. In System settings, you can manage the service, user caching, and rebuild configuration or uninstall this package but from user settings, you can enable or disable cache and also Clear cache.
Step 4: Test Configuration & Monitor NGINX Performance
Once reverse proxy rules are configured, it’s imperative to test the setup to confirm that NGINX effectively manages incoming requests and directs them to the designated backend servers or applications. To maintain optimal server performance and detect any potential issues or bottlenecks, regularly monitor NGINX performance using third-party monitoring solutions.
Installing NGINX Manager with reverse proxy functionality on cPanel WHM using a graphical interface streamlines the process of managing web server configurations and handling incoming traffic effectively

I’m Sachin Gupta — a freelance IT support specialist and founder of Tech Transit. I’m certified in Linux, Ansible, OpenShift (Red Hat), cPanel, and ITIL, with over 15 years of hands-on experience. I create beginner-friendly Linux tutorials, help with Ansible automation, and offer IT support on platforms like Upwork, Freelancer, and PeoplePerHour. Follow Tech Transit for practical tips, hosting guides, and real-world Linux expertise!