
Last Updated on 4 months by Sachin G
Java JDK is a widely-used programming language, known for its versatility and compatibility across various applications. Keeping Java up-to-date on your Red Hat Enterprise Linux (RHEL), CentOS, Fedora, AlmaLinux, Rocky, Oracle or Linux-based operating system is crucial for security and performance reasons. In this article, I will explain to you all how to install and configure Java JDK latest version on RPM based Linux operating system.
     Operating System: Fedora Linux 37 (Workstation Edition)
     Kernel: Linux 6.5.5-100.fc37.x86_64
     Architecture: x86-64
Two Method to download and Install
1: Through yum repository
2: Through Linux Binaries
Method 1: Install Java JDK through yum utility
Before installing Java via the YUM repository, it’s important to start by searching for and inspecting the available information using a Yum or dnf tool. This information will show which version of Java will be installed through the ‘java-latest-openjdk’ package. Subsequently, you can access the Java RPM package in the application stream repository and utilize either the ‘dnf’ or ‘yum’ command in a Linux environment for installation.”
# dnf search openjdk
Now list and install the latest version of Java install.
# dnf list java-latest-openjdk
# dnf info java-latest-openjdk
# dnf install java-latest-openjdk
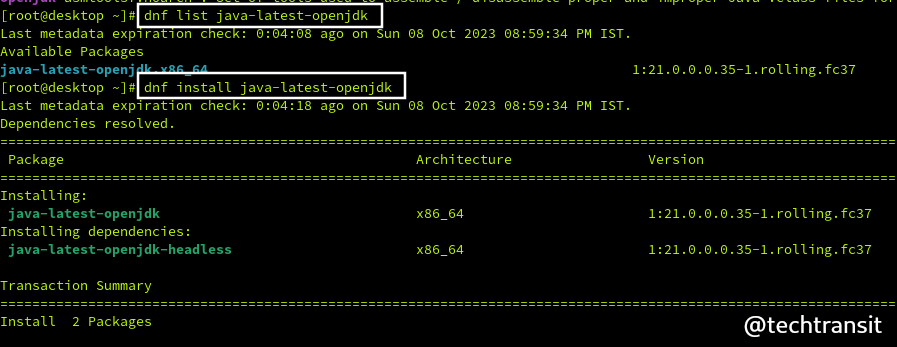
In the ‘dnf search’ results, you will find various available versions of the JDK. If you have a specific version in mind that you wish to install, simply choose the name of that particular version from the list and proceed with the installation.
To verify the installation, you can execute the below command :
# java --version
openjdk 21 2023-09-19
OpenJDK Runtime Environment (Red_Hat-21.0.0.0.35-1.rolling.fc37) (build 21+35)
OpenJDK 64-Bit Server VM (Red_Hat-21.0.0.0.35-1.rolling.fc37) (build 21+35, mixed mode, sharing)
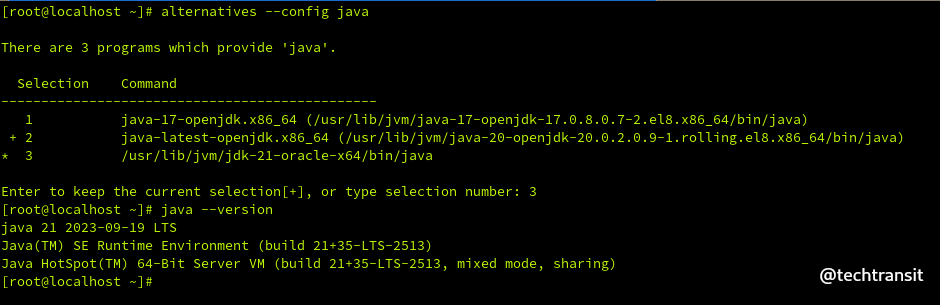
Set Default Java jdk Version :
If you have installed different Java versions installed on your Linux system, you can set the default Java version using the alternatives command. This will allow you to switch between different Java versions easily.
To list the installed Java versions, use:
# alternatives --list
To set a default Java version, use:
# alternatives -config java
Method 2: Download & Install Java JDK through Linux Binary
Download the latest Java SE Development Kit from its official Java vendor website. Below are the steps to extract and download JDK files in a temporary folder in Linux. You have to download the tar archive file. We downloaded the JDK file in our temp folder. We will go into the /tmp folder and extract it there.
OpenJDK JDK binaries are available for Linux on jdk.java.net as compressed zip or tar.gz archives.
# cd /tmp
# wget https://download.oracle.com/java/21/latest/jdk-21_linux-x64_bin.tar.gz
# tar xzf jdk-21_linux-x64_bin.tar.gz
# mv jdk-21  /opt
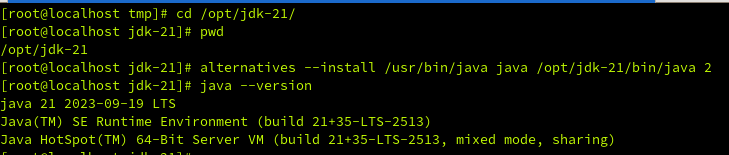
Install Java 21
Now we have got extracted folder of Java. The alternatives command is the best way to install Java. Go to the extracted folder of Java and run like below command as shown.
# cd /opt/jdk-21

# alternatives --install /usr/bin/java java /opt/jdk-21/bin/java 2
Now we should set the jar and javac path
# alternatives --install /usr/bin/jar jar /opt/jdk-21/bin/jar 2

# alternatives --install /usr/bin/javac javac /opt/jdk-21/bin/javac 2

# alternatives --install /usr/bin/javac javac /opt/jdk-21/bin/javac 2

# alternatives --set javac /opt/jdk-21/bin/javac
Set Java Environment Variables :
After the set of Javac and JRE paths, we will set the environment variables in Linux. Many application needs to use the JAVA_Home or JRE_HOME environment variables for the Java executable to use.
Set the java jdk home variable using the below command.
export JAVA_HOME=/opt/jdk-21
Path set jre home variable use below command
export JRE_HOME=/opt/jdk-21/jre/
Setting the path variables use the below command
export PATH=$PATH:/opt/jdk-21/bin:/opt/jdk-21/jre/bin
Verify Installed Java JDK Version
Now check the version of installed Java on the Linux box through the below command
java 21 2023-09-19 LTS
Java(TM) SE Runtime Environment (build 21+35-LTS-2513)
Java HotSpot(TM) 64-Bit Server VM (build 21+35-LTS-2513, mixed mode, sharing)
if the java command not running after setting the environment variables, you can add the below lines in bashrc and profile files in the /etc directory.
JAVA_HOME=/opt/jdk-21/
export JRE_HOME=/opt/jdk-21/jre
export PATH=$JAVA_HOME/bin:$PATH
Congratulations, Now we have installed, run, and configured Java!

I’m Sachin Gupta — a freelance IT support specialist and founder of Tech Transit. I’m certified in Linux, Ansible, OpenShift (Red Hat), cPanel, and ITIL, with over 15 years of hands-on experience. I create beginner-friendly Linux tutorials, help with Ansible automation, and offer IT support on platforms like Upwork, Freelancer, and PeoplePerHour. Follow Tech Transit for practical tips, hosting guides, and real-world Linux expertise!