
Earlier we had resisted to build a business website hosting environment on Amazon cloud services .
Here in the steps we build hosting environment of cPanel & WHM on AWS cloud virtual server. This is virtual private cloud server . The feature of NAT infrastructure on AWS plateform built good hosting architecture.
In the setup to build cpanel & AWS on AWS EC2 instance , we need to setup a VPC,security group, instance,AWS Route 53 DNS and on AWS infrastructure after that cPanel/WHM installation on the EC2 instance .
We will follow these points on hosting environment setup.
(1) Set up VPC ( Virtual Private Cloud )
(2) Create Security Group AWS
(3) Launch Amazon Elastic Compute Cloud ( EC2 ) Instance
(4) Elastic Hosting IP address or Network Management ( NAT infrastructure )
(5) DNS Route 53 Management
(6) Install cPanel/WHM
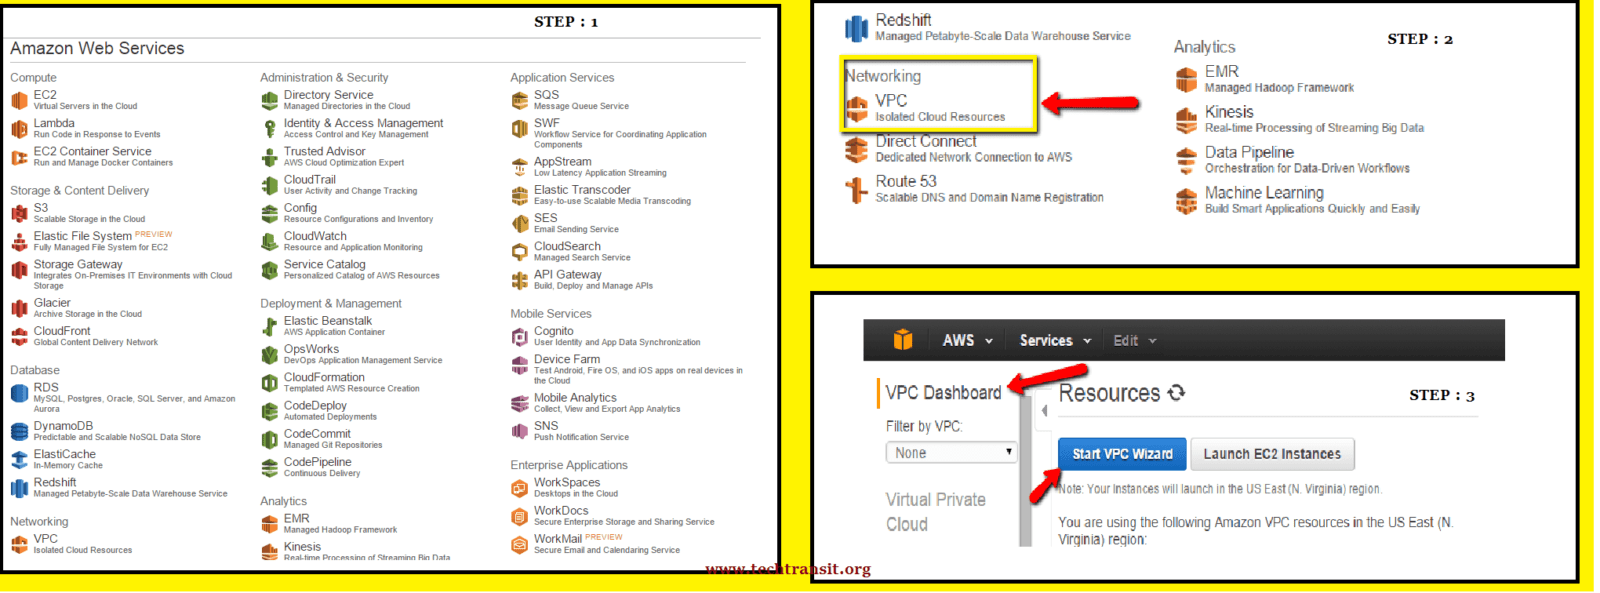
Sign In in your Amazon Management Login Console at the url . Sign In AWS Console
Steps 1 : Create and Set up VPC
Login in AWS Console and get Amazon Web Services Management Interface and navigate to Networking and click on VPC.
AWS Management Services => Networking => VPC
STEP 1 : In AWS Management Services there will be lot of services. Search VPC.
STEP 2 : Select and click on VPC.
STEP 3 : On VPC Dashboard click on Start VPC Winzard .
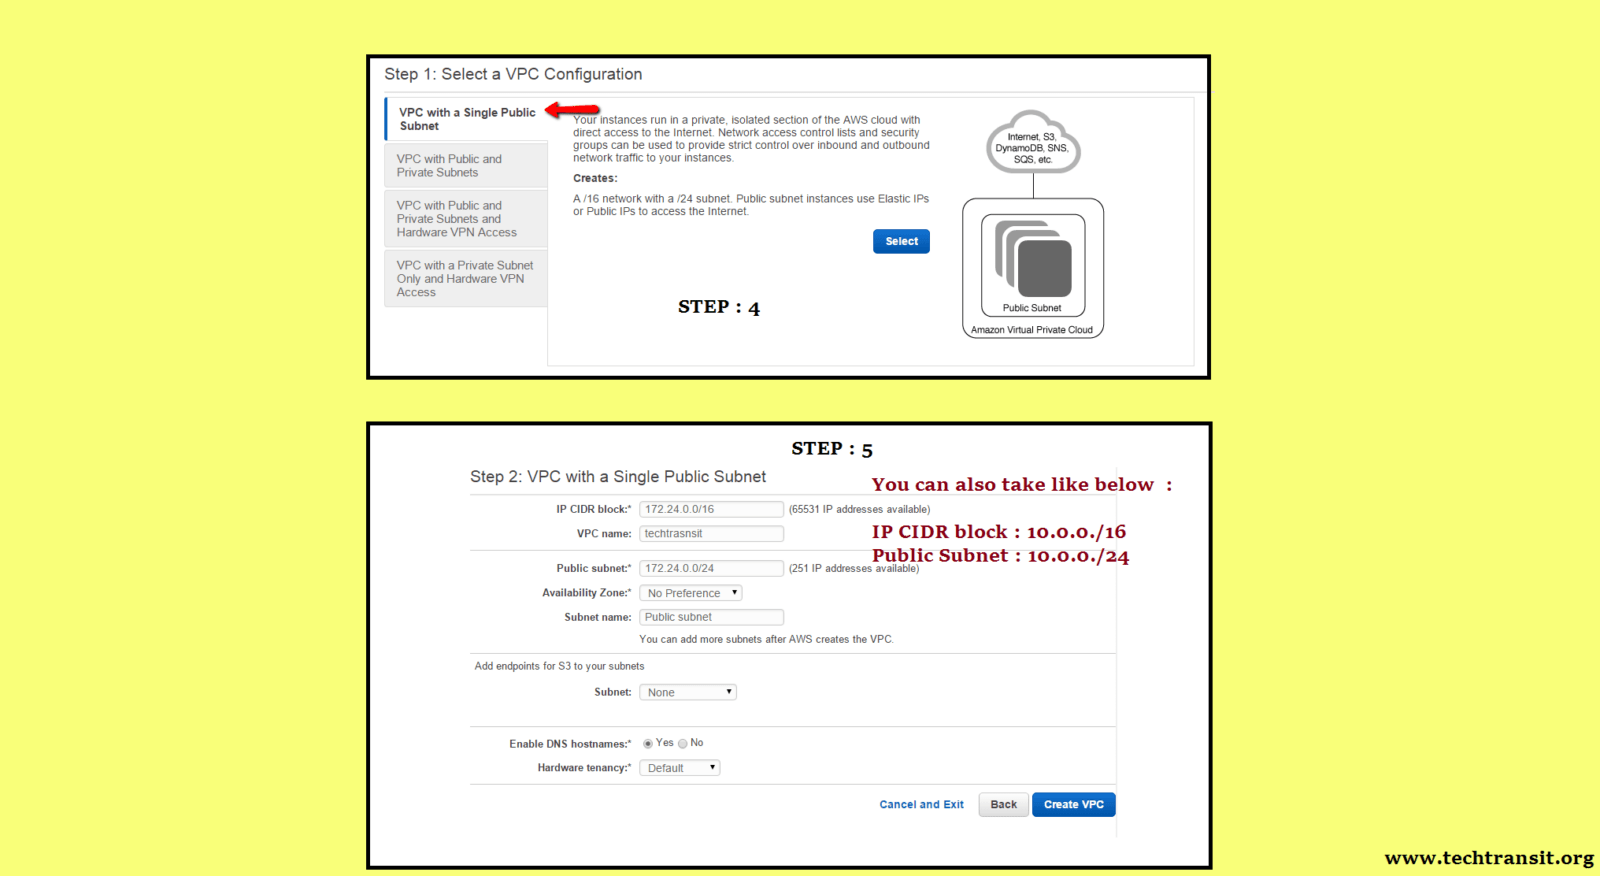
STEP 4 : VPC Wizard,choose VPC with a Single Public Subnet.
STEP 5 : You need to select CIDR ranges that you want to use for your vpc and subnet Here I have recommend in image like you can select 10.0.0 /16 and 10.0.0.0/24 . Enter name of a vpc and rest of default parameters you can leave as it is and then click Create VPC, it will show process complete status bar and complete setup.
Now you will get confirmation from wizard that your VPC has been successfully created .Click ok and check VPC Dashboard , there will be display your created vpc and Default VPC is No .

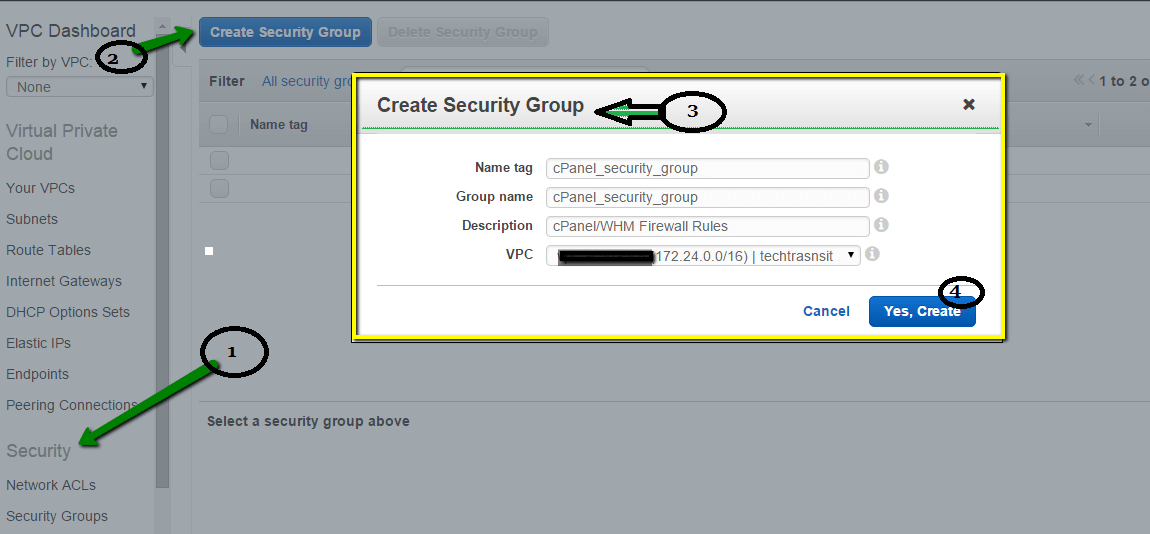
STEP 2 : Create Security group AWS
In security group , we can define firewall rules that will apply on instance or server basis.
In VPC Dashboard , navigate Security Groups in Security section.
Amazone VPC Console ==> Security Groups
Navigate and click Create Security Group.
2.Give name of Security Group and choose VPC ID number, which you have created in setup.
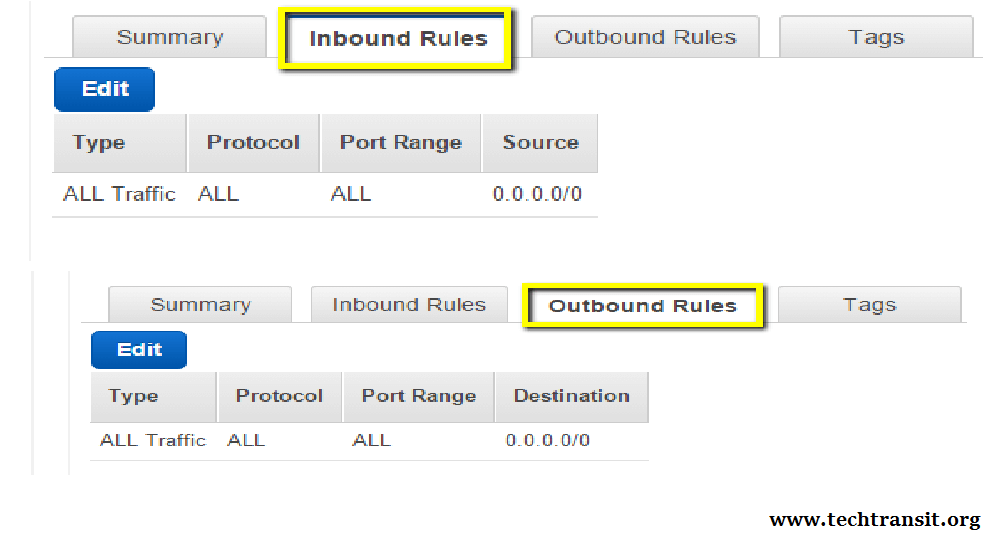
Now you can configure inbound and outbound rules and tags . In fresh cpanel/WHM setup we will recommend to allow All Traffic from a new rules .
(a) Edit inbound rules, select All Traffic and source will be 0.0.0.0/0 and click Add Rule.
(b) For Outbound tab allowed by default “All Traffice” ==> source 0.0.0.0/0
P.S : We have open all inbound and outboud ports, you can change open and close port according to environment which you need. cPanel supports lots of support software firewalls that are the freely available to configure and install . Best security firewall is CSF ( Config Security & Firewall)
STEP 3 : Launch Amazon Elastic Compute Cloud ( EC2 )
We have already explain about how to create amazon EC2 instance on my post . CLICK HERE
but here we are giving overview , you can refer that post for image representation.
(1) Open the EC2 Console in AWS Management console. [button link=”https://console.aws.amazon.com/ec2/” newwindow=”yes”] AWS Console Login[/button]
(2) Click on “Launch Instance” in the header menu.
(3) Choose AMI , which you want to use.
When you are choosing an AMI, confirm that your storage type should be EBS-Backed because EBS storage is separate storage is backed by S3 features and is not dependent on your instance.
(4) Select Instance Type , means select server specification.
(5) In Fifth steps , we need to configure instance details.
(i) In Network , select VPC ID which we have created on start. subnet will automatic select.
(ii) Add your IAM Role or create IAM Role .
(iii) check shutdown behavior, it should be “STOP” otherwise it will terminated in shutdown.
(iv) You can enable accidental termination through Enable termination protection.
(v) if you need also monitoring of server , you can enable .
(vi) Now we can setup private ips on our instance because automatic ip can be changed. Set an appropriate ip address to your instance like you have select sub net range , we have choose “10.0.0.16”.
(vi) Click continue .
(6) Now set and configure storage device configuration like disk size you want .
(7) In next step we can add tag name of instance .
(8) Now here we need to create security group or select earlier created security group for access server access and security. Here we have already created group in second steps, so select security group which we have created.
(9) After that all settings have been set , then Review Instance Launch page, you need to review all configuration and click on Launch button.
(10) After click on Launch button tab we need to create security key pair keys to connect ec2 from your system or machine and download that key-pair and preserve at safe place and always remember that keys never lost . so you need to save on safe place.
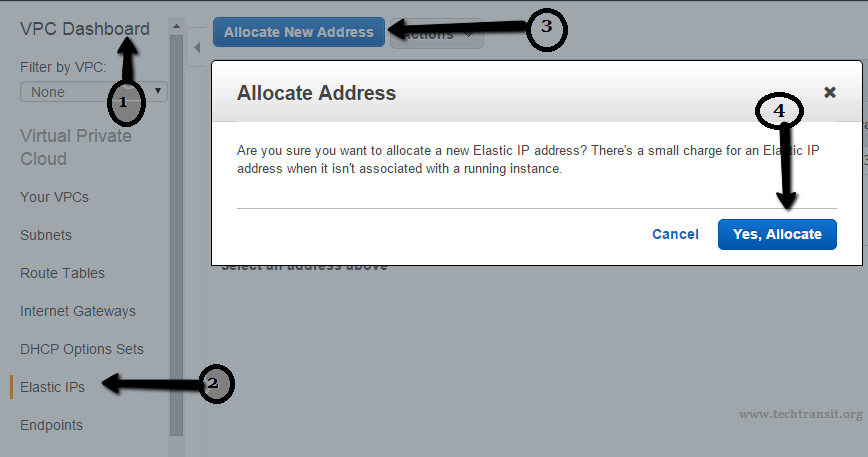
Elastic IP or Network Management ( NAT infrastructure )
Allocating or Set Up Elastic IP :
Elastic IP are static ip and public ip address for cloud . Elastic IP address will associated with account and then we can assign on the instance.
Steps are to Allocate New Address :
(1) In VPC Dashboard ==> Go to Elastic IPs .
(2) Select and Allocate New Address and click on Yes, Allocate to Setup .
Set Up Elastic IP :
On Amazon VPC Console ,Navigate to Elastic IPs in the left hand.
Search your allocated IP Address in the list and select the box with that ip address.
After selected address , click on “Associate Address” button in the menu section.
Select you instance from instance list and check correct private ip should be selected.
Important note is Confirm , you should enable “Allow Reassociation” , this means that your vpc will reassign this elastic ip to this instance in the time of reboot or shutdown otherwise you need to manually re-associated the elastic ip with the instance.
Now go to “Yes,Associate”.
Install cPanel & WHM :
Login to your server through root user with ssh pem keypair or you can convert pem to ppk key.
# ssh –i server.pem root@server_ip
also set your root password through below command.
#passwd
After that you need to update your server packages, it is depend OS , you have choosen.
For Ubuntu or Debian server you need to run below command.
# apt-get update && sudo apt-get upgrade
For Redhat and CentOs System , run below command for server packages updated.
# yum update
After update reboot the server once.
Now set the hostname of server.
Install cPanel/WHM
Go to your home directory .
# cd /home
Install wget command through below command.
# yum install wget.
Download cpanel installer file
# wget -N http://httpupdate.cpanel.net/latest
Run the cpanel installer script.
#sh latest
Now script wil run and takes some time to install cpanel and when once the scripts will finish you need to open cPanel like below url.
http://your-server-public-ip:2087
Thank you .