
In the age where data privacy and security are paramount, having control over your cloud storage becomes increasingly important. OwnCloud, an open-source solution, allows you to create your private cloud storage server, giving you the ability to store, access, and share your files securely.
ownCloud Description
ownCloud is opensource private cloud storage software package that works as straightforward way to serve and store content from its centralized location, Dropbox, iCloud is very similar application which provide this functionality but these are not trust able and users want to secure the data or fetch the data from off the cloud. Now Run your own private cloud storage server and manage the data with sharing with anybody , syncing with mobile and desktop device , documents and notifications etc….
Reason behind to Use ownCloud
- ownCloud is open source based free tool that have not any limitations and make changes as you wish and this means you have full control over your data, and you’re not relying on third-party providers.
- Data can be share with anybody , who is in your know very well. It supports end-to-end encryption, meaning your files are encrypted on your device, transmitted in encrypted form, and stored in an encrypted state on the server. This significantly enhances the security of your data
- Flexible secondary storage to provide data to store.
- You can read PDF’s , see videos with live or real time text editor .
- Set limits through quota management on external storage.
- Support of Accessing of Directory through integration with LDAP / Active
- ownCloud maintains files previous versions, so that we can recover from any accidental delete.
- Task can be synchronized with calendar .
To Read more about the features of ownCloud CLICK HERE
Why Upgrade from Version 8 to ownCloud 9 ?
- In latest version, new feature is more Reliability like checksum feature , method of data protection and code integrity checking. When number of users make concurrent changes and access simultaneously in same data then file locking produces error or loss of data , now in latest owncloud 9 depreciate the issue.
- Newer releases have supported for more users.
- Client will take benefits only in newer version server.
Need to know more about why we should use upgrade newly ownCloud 9 READ MORE
Steps to Install ownCloud 9 on CentOs / RHEL 7 Server :
Server Requirements
- Minimum RAM required by ownCloud Software : 128 MB
- Recommended RAM required by ownCloud : 512 MB
You can use RAM according to your requirement or server resources usage or users activity.
Package or Software Requirements
⇒ Server OS : Best recommended OS is RHEL 7 ( Red Hat Enterprise Linux 7) or use Linux latest OS, Ubuntu 12.04 , 14.04, 14,10 LTS version.
⇒ Web Server : Apache 2
⇒ Database Server : MySQL / MariaDB 5.x, Oracle 11g, PostgreSQL
⇒ PHP 5.4+ Required
Install Software Collections ( SCL ) Repository
We need to set up first Software Collections ( SCL ) Repository on our CentOS 7 and SCL for RHEL which is compiliance with RHEL server contract.( Do not use any other third party repository ) Server through below command.
For RHEL 7 Subscription
# subscription-manager repos --enable rhel-server-rhscl-7-eus-rpms
For CentOs 7
# yum install centos-release-scl –y
Install and Configure Apache Web Server
Begin by installaing the httpd packages.
# yum install httpd –t
Start and Enable httpd service.
# systemctl start httpd.service

# systemctl enable httpd.service
Install PHP 5.5 or Upgrade to PHP 5.5
ownCloud works on PHP 5.4 but this is version of php has been end of life but Red Hat support php 5.4 on lates version 7 . better is use of 5.5 for better performance and security.
Here we are assuming in this set up you have taken fresh server , where there is no php or apache server is configured.
Now install PHP and its module . also php mysql module .
# yum install php55 php55-php-gd php55-php-mbstring php55-php-mysqlnd php55-php
Then restart apache server.
# systemctl restart httpd.service
Install & Create MySQL/ MariaDB Server
Install MariaDB on server server with yum command. Mariadb group install mariadb-server, mariadb-bench, mariadb-test.
# yum groupinstall mariadb mariadb-client
# systemctl start mariadb ( Start the MariaDB Server )
# systemctl enable mariadb ( Enable for Boot Time )
Verify of the status of service.
# systemctl status mariadb
Configure the MariaDB Server to improve security. Run below command and read carefully and follow its instructions.
# mysql_secure_installation
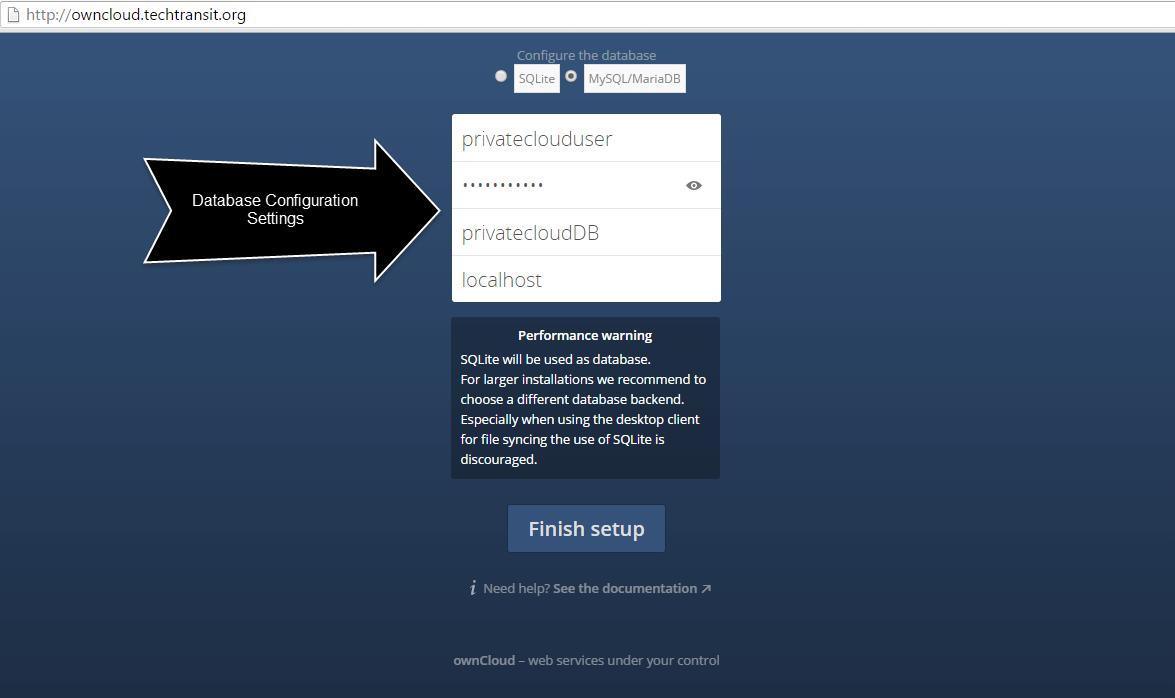
 mysql -u root -p
Enter password:
MariaDB[(none)]>CREATE DATABASE privatecloudDB;\n
MariaDB[(none)]>GRANT ALL ON privatecloudDB.* to 'privateclouduser'@'localhost' IDENTIFIED BY '[ENTER_PASSWORD]';
MariaDB[(none)]> FLUSH PRIVILEGES;
MariaDB[(none)]> quit
Install ownCloud 10
Download the latest version of own cloud software from it official web site . Download Here
Currently software is available on zip and bzip2 compressed file and also download its checksum files to Verify the MD5 or SHA256 .
Here we are going to download through tar compression file relatives checksums and check and download through below steps.
Download ownCloud 9.x bz2 file.
# wget https://download.owncloud.com/server/stable/owncloud-complete-20231009.tar.bz2
Download MD5 or SHA256 sum
# wget https://download.owncloud.com/server/stable/owncloud-complete-20231009.tar.bz2.md5

# wget https://download.owncloud.com/server/stable/owncloud-complete-20231009.tar.bz2.sha256
Verify :
# md5sum -c owncloud-9.0.0.tar.bz2.md5< owncloud-9.1.4.tar.bz2
owncloud-9.1.4.tar.bz2: OK
# sha256sum -c owncloud-9.1.4.tar.bz2.sha256 < owncloud-9.1.4.tar.bz2
owncloud-9.1.4.tar.bz2: OK
Unpack the downloaded bzip2 compress file through tar command.
# tar –xjf owncloud-9.1.4.tar.bz2
Configure unpacked code directory on website web server document root . Here I am renaming the directory from owncloud to myprivatecloud
# mv  owncloud myprivatecloud

# cp –rvf  myprivatecloud  /var/www
Configure Apache Virtual Host
Create the file /etc/httpd/conf.d/owncloud.conf with the following contents :
<VirtualHost *:80>

ServerName  [email protected]

ServerName  owncloud.techtransit.org

DocumentRoot /var/www/html/myprivatecloud

</VirtualHost>

Alias /owncloud "/var/www/html/myprivatecloud"

<Directory /var/www/html/myprivatecloud >

Options +FollowSymlinks

AllowOverride All

<IfModule mod_dav.c>

Dav off

</IfModule>

SetEnv HOME /var/www/html/myprivatecloud

SetEnv HTTP_HOME /var/www/html/myprivatecloud

</Directory>
Now restart apache service.
# systemctl restart httpd.service
Run your own cloud storage
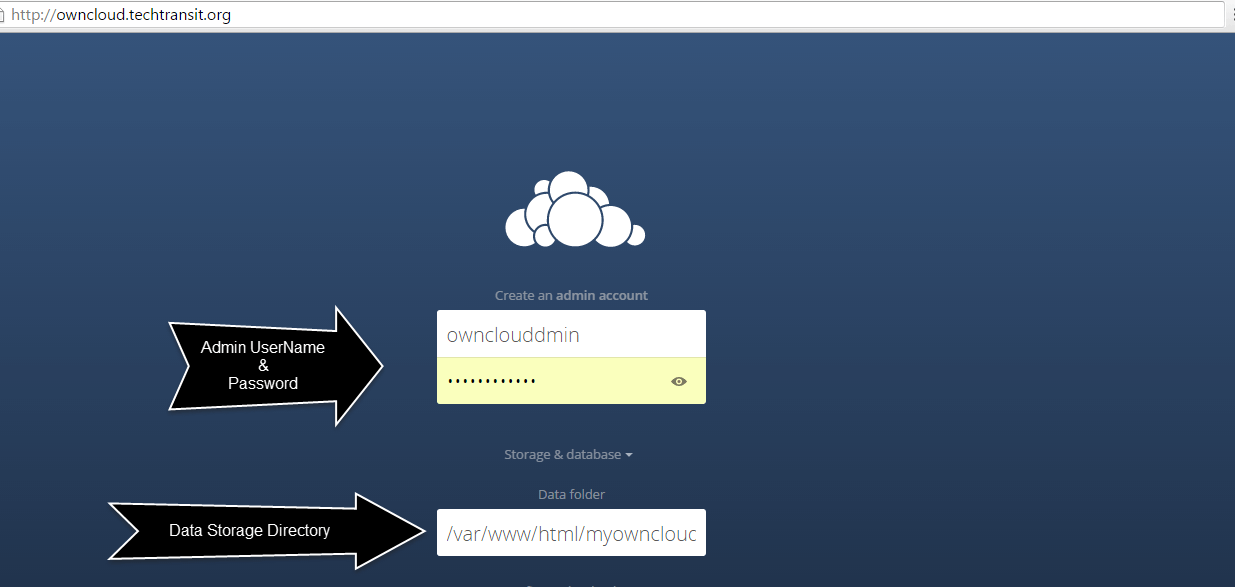
After restarting Apache you need to start installation through graphical method through given fqdn.
# http://owncloud.techtransit.org
Now below showing images for installation steps in browser, in first images , here i am giving admin portal username password. which will create for admin login and directory location where data will be stored. you need to set proper permission on that location and in second image you need to set database username database password and database name , which we have created in configuration time.
Thank you 🙂 Hope you have enjoy the installation instruction.